In my time of playing music I’ve learned to draw some parallels in other areas of life, a big one is in drawing. While I personally can’t draw, I apply some fundamentals that transfer well over to music (in my mind at least). For example, a tree in its most core shape is a rectangle, pointing up, the details of the trunk get more defined and that hides the basic rectangle within the tree itself and you see a tree instead of a collection of shapes. The shape gets definition as you try to mold it into the image you want. The same principle is applied in a song written in a specific key (which we will be getting into later in another post), if you know the “shape” of the key that’s forming the song you can recognize it like a rectangle in a tree, but its details are what define it as a specific song or image.
There are as many songs that use an E major scale as drawings that use a square. In the end you don’t see too many pictures with a single shape, a single square is a bit abstract to leave just that as it is, the artist molds the shape, there can be adjustments like making a couple of the corners rounded instead of the sharp edges and that’s just starting off points to adding more shapes as your goal image is being formed. As you get more comfortable drawing you won’t rely on the concept of the image on a shape-by-shape basis, instead opting for some free-hand drawing since you’ve gained the ability to skip the geometric visualization and into the real result you want. You know what a perfect square is, but you don’t want a perfect square in your drawing, it’s just reference shape to get you where you want to go to. When you’re working with music theory, you could get a base understanding of a single scale, going through multiple octaves, and create your freehand music that’s not going for a simple run through the “basic” shape (rectangle in drawing, E Major in music) but manipulation to create your art. In scales there are complementary shapes like E major and G minor, you might not see it but the more learned will. Do you Have to learn to use music theory? Absolutely not, for some the “right” notes just come logical without understanding, but learning it will help you develop your writing ideas when you’ve exhausted your trunk of ideas. If you don’t recognize that the tree you drew had a rectangle implied, that’s not a big deal, but the understanding of what is in your image helps you plan your future drawings/art.
Right here is, in my opinion, a fantastic video to get you introduced to how one can use what they’ve learned well enough to make the theory secondary to the song itself.
“Theory only comes in if there’s a problem; it’s a tool. Like riding in a car, the tools are in the trunk, not in the passenger seat. I hope I don’t have to use it” -Victor Wooten
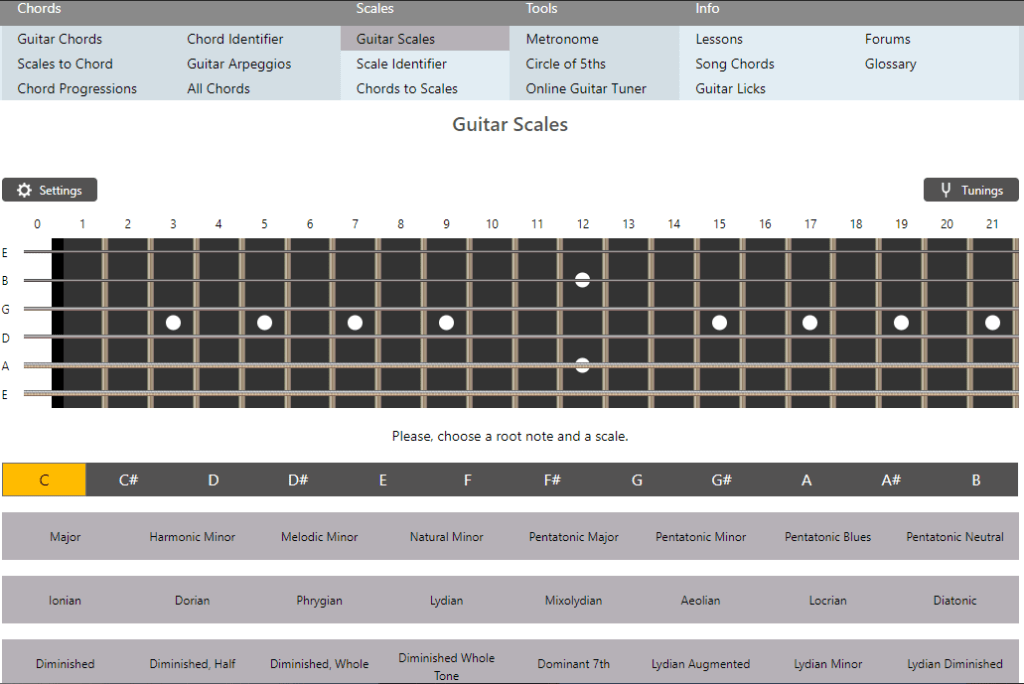
At the bottom of the homepage you may have seen a list of some “Useful Links” for various aspects of your learning voyage. We’ll be going over what they are and what they can be used for
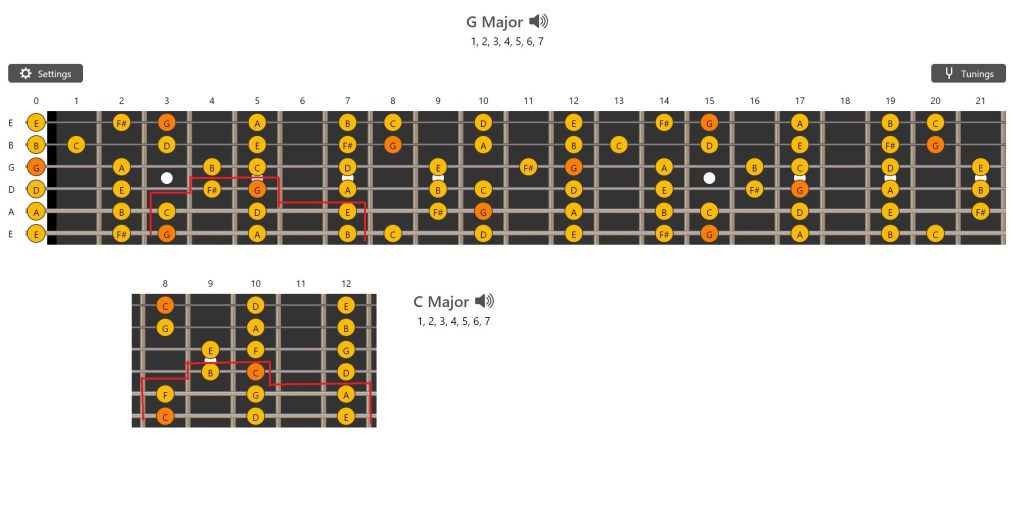
Just going to the link brings up a platform to look up all the scales you can think of, but the site goes beyond that! You can even change tuning, look up chords, use a metronome among other awesome tools! (HERE is an article on how to read the charts)
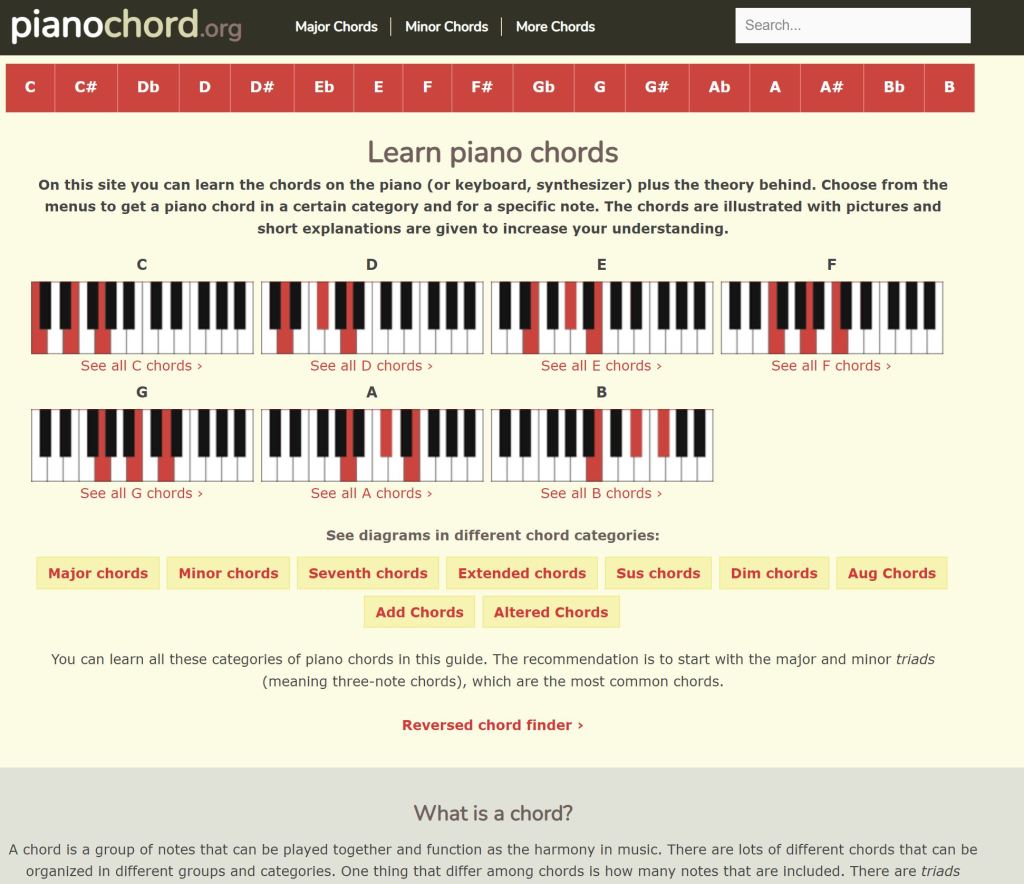
This is essentially an online chord book for piano, pretty darn awesome! HERE is an article on how to read the stuff on this site or anywhere that you may find chords written like this. Learning piano may seem weird, but it will help you if you learned any other instrument. It will help you visualize the structure of notes in a linear format, which I go in depth at the top of the linked article for this tool.
This is a program that I relied on for learning so much of what I know now. It’s so well respected that you can buy official tabs from artists themselves in the guitar pro format. This has a chord book/library, and the same for scales. You can transcribe to any instrument you have in mind, just with the understanding of your instrument of choice. You can make something written by guitar but transcribed through a violin or a whole darn orchestra. (in an upcoming article, I will go more into detail of this program)
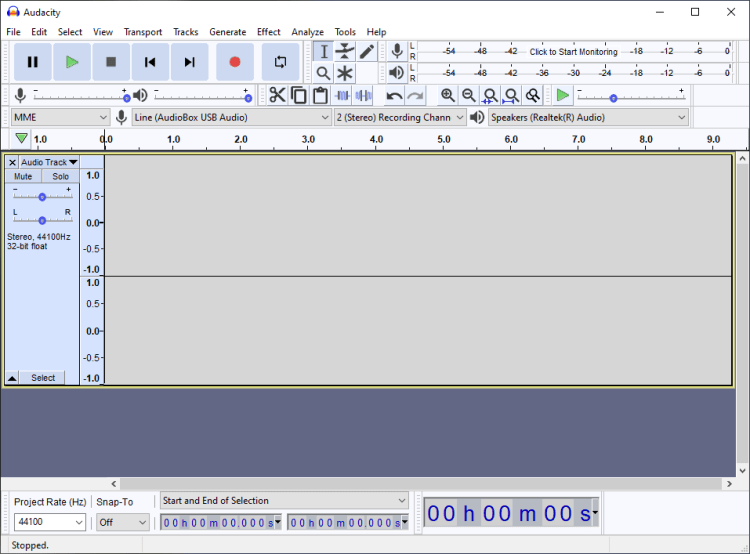
This is as bare bones as you can get compared to guitar pro while still having tools like chord and scale charts, but it’s free! The MIDI engine is much nicer in guitar pro than this, which relies on some old tones that have been in many musical devices for decades (specifically the cheaper stuff of nowadays)! Definitely not as visually pleasing as Guitar Pro, but it’s all about the functionality… Which is still a pain in the butt to start composing stuff. I’m still learning to set up settings properly to making editing more intuitive for myself, as a I grew up with the Guitar Pro software which had a fantastic UI (user interface).
This is a deceivingly easy program to work with. The main functions you’d want are up front and easy to get started on making new music. There are, however, many functions you can find in the interface. You can add post effect, you cut and splice your audio, you can set your bit rate and so much more. There are other open source software to use, but this one is probably the simplest and popular. I’ll go in depth on this program soon
Preface: This will be a brief way to look at the connection between chords and scales on guitar. I have articles on Scales and Chords, going in depth in how they work and how they are read in charts. If these images seem confusing, you should read the pages before reading on to familiarize yourself with the concepts discussed here. You should also check out my article on the relationship much more in depth of this topic, which also brings up working with piano and the theory behind the relationships themselves. This, here, will be a rather simplified approach that may leave you with more questions. These articles will hopefully answer them for you, but for now, consider this a teaser.
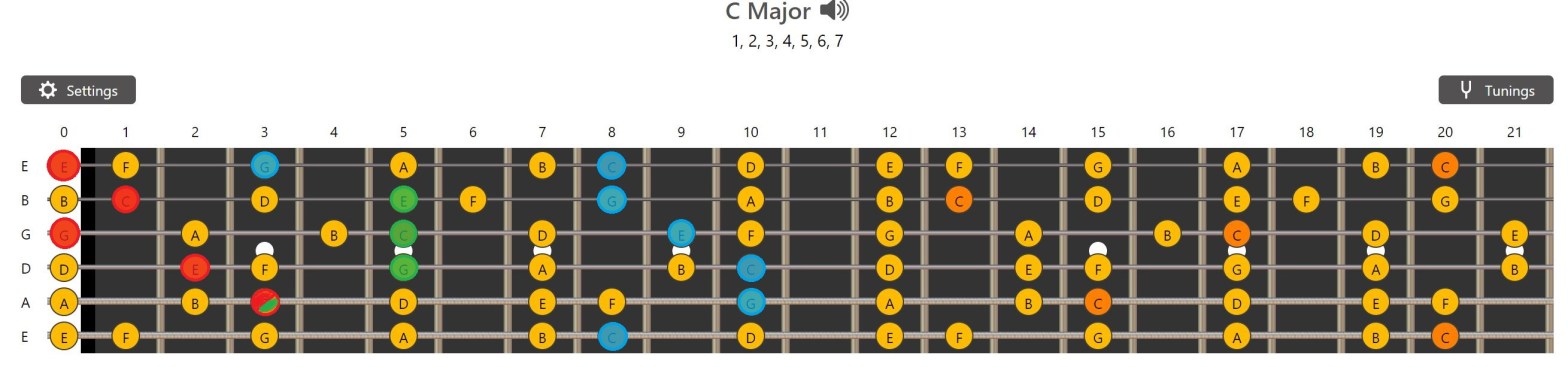
C Major Scale
Up above we got the C major scale in all its glory and possibilities. Start from any position and end it where you want. It’s the map of all the streets and you have no GPS to weave you through specific patterns/routes. You choose how you create your route (chord), there are usually fancy names to identify that sound scary, you don’t need to know what it is, but how to use it.
C Major Chord in 3 positions
Then we have the C major chord expressed in 3 different variants, depending on where the root is located on the neck. Note that in shape 1 and 2 there is an overlap of the third fret, on the A string.
The chord Variants Overlaid on the scale for the notes that ring out, specifically
Now we have all 3 variants thrown in the major scale. All major shapes for chords will go over some spots of the major scale
Shape 1 “reorganized”
Now here we rewrote the C major of position 1 to be built off the Low E string. Root of the position 1 chord is C4 (middle C) on the A string 5th string, while the C4 on the low E string is on the 8th fret. E4 on the D string then gets transformed to the 7th fret of the A string. From there we are trying to transform every note from different roots
We got an intro to recording in a post, and this time we’ll go a little more in depth to recording with one of the methods discussed. To me, direct-in means to have an instrument connected directly to an interface, without a microphone. You can still put in pedals into your chain to color your tone, or you can go with a bone dry signal.
Wet or Dry??
When you think of “dry” you can think of a bone. Nothing is added to the bone, but in of itself it can be used to create a great stew. In recording, our bone is our “core” tone of the instrument. It’s the sound of a clean amp, it can be the typical tone one might imagine with jazz. You plug into the sound “output-er” (it can be an amp, a PA or an interface, anything that has an input does something with the instrument’s signal whether recording or outputting) and essentially only mess with your highs, mids, and lows, however the options you may have are described (some amps have all 3 EQs, some have a full band EQ like 10 sliders, and some have a single “tone knob” to encompass the sonic space of the amp.) For some people “dry” would mean to plug in with the knobs at 12 o’ clock or have an interface that takes a signal without a knob for altering the EQ, only the input volume, and for some, dry means to only use non-modulating effects like distortion, overdrive, fuzz etc. The purpose of the dry recording is to have something you can color later on with fine tuning. You record dry so you can “wet” it later.
A wet signal is usually the sound, as you envision with modulations and all, as the end result in your signal. Modulation effects include things like delay, flanger, pitch shifters, chorus etc. I will go more in depth in what they are, and how they work soon. For now it is thought as the effects that might need more fine tuning. You might need a delay that works to a different setting than you normally are set up for, tap tempo on your pedal can be tedious compared to setting a good delay sound in the DAW and setting the time in post to a set BPM or Ms so nothing will be lost when you want to tweak your tone after the recording.
So, going dry, we think of making the stew with just the bone and add the ingredients to fill it up after the stew is made to make the meal. Going wet is the putting the bone with the ingredients to cook at the same time. In the end, it’s about the salt, are you going to over salt the stew in the pot or prepare it a little under to add to the dish served? A ruined pot is worse than a ruined bowl. In recording, we added a lot of effect to the audio from the start (over salting, here maybe putting too much drive) and we can’t recover that (try the potato hack for the stew, but potatoes won’t work for recording. You can’t de-distort with a potato in the mix somewhere or anything after you captured the over-distorted audio, if there is, it would clear voice scramblers and make those voices for interviews go from sounding like they inhaled sulfur hexafluoride to their real identity, it’s more than just pitch shifting the source audio)
What You Need To Get Started
Audio Interface
We need this to capture our analogue audio and digitize it into an audio format the computer system and recording software can recognize. It goes from vibration you can feel to enough 1’s and 0’s to make a .wav file (or your preferred format, they each have different compression values for very different bit rates.)
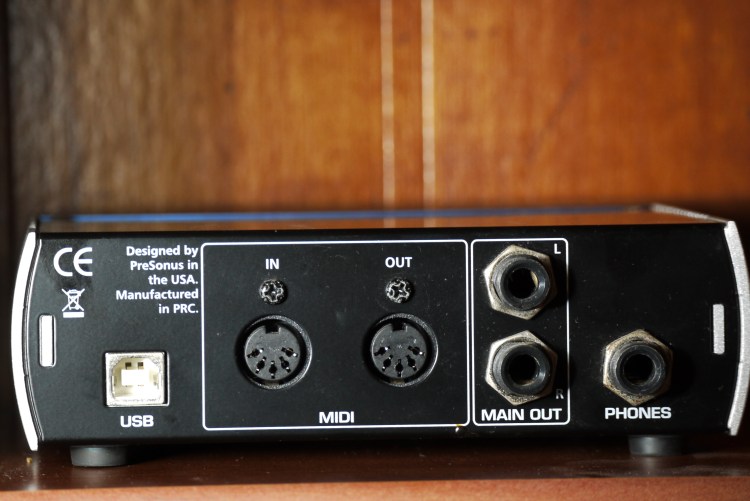
This device also routes the ins and outs of your audio signal, the outs are just in the back. Want to connect your electric violin? It’ll receive it through the connections in the front. Want to hear it? Connect headphones into the “PHONES” port or the combination left/right “MAIN OUT” to monitor speakers. You could also set your DAW to output audio through your computer speakers, but having something built for processing audio, at better quality, is the more reliable route. Some computer’s built-in audio interfaces may not be good, some might, but an interface like this assures you minimal colorization.
There are also other things you can use as a digital interface to route audio for recording and listening. One way I sometimes record is with my multi-effects unit. The one above has lots of ins and outs. Connect the USB cable, download the appropriate drivers, and it’ll be your digital interface to work with your software. Connect you instrument and source of output audio and you’re set!
Instrument Cable(s)
You need something to route your audio, ins and outs. From your instrument to a speaker that gives vibrations.
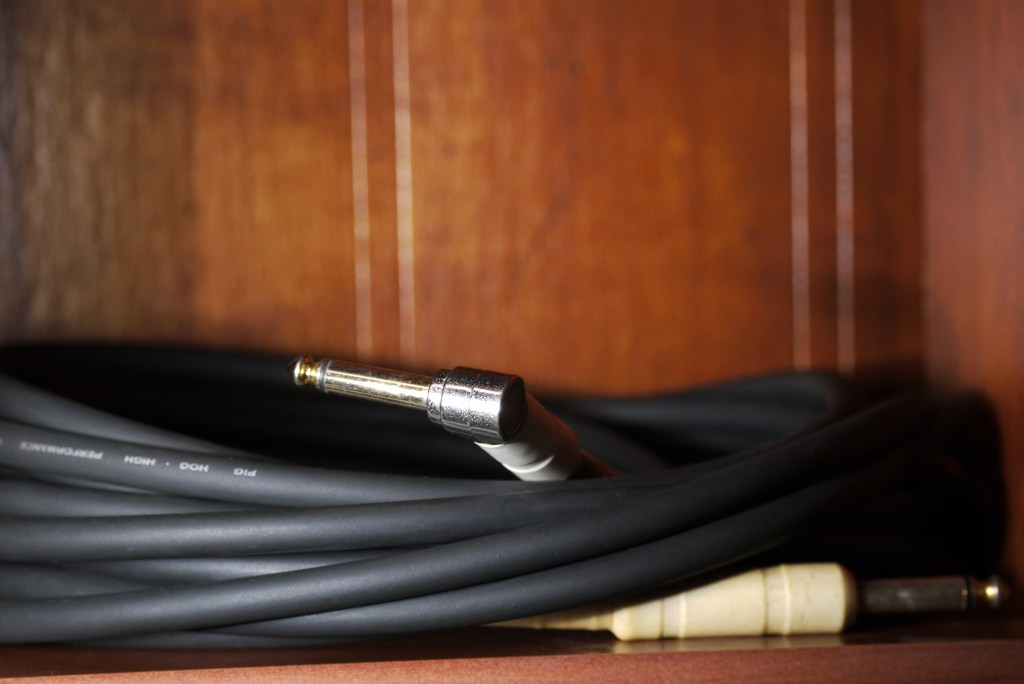
Your Instrument
Many years ago that jack had no scratches
You need something to give you something to capture! You want something with electronics (pickups) that can be transferred from the output connector up top to your device to record. If it doesn’t have that, then you’re not going direct-in with the interface, you’re needing to mic things up, there ain’t no electric clarinet.
Software
Audacity
This is where wars are formed (just kidding, kinda…) The software you choose affects your workflow, though their fundamental functions remain the same. There’s little quirks that irk people or make it a favorite for another user. That’s all down to personal choice. Some are as basic as a recording software like audacity (which is surprisingly powerful but light) or more feature rich software like StudioOne, Pro Tools, Cubase, CakeWalk, Waveform, Ardour, Reaper and many more with advanced plugins, MIDI sound banks and much more. I like messing with freeware and open source software, free is the best price to pay. It’s the philosophy of freeware/open source software, though they always accept donations. It takes a ton of hours to make a program to record the sound of you eating cereal to sample and make the next avant-garde aural experiment.
My only note would be to avoid quantization of your music. Many DAWs have that as an option on by default and, in my opinion, ruins the organic nature of playing. You can use a touch, but don’t let it be a crutch. This is a pretty intensive topic that I will discuss later on. Just for a little reference, that is what makes what you recorded hit everything ON the beat, even if you didn’t when you actually recorded it. It’s the nature of electronic music with its programming, to a certain extent, not an instrument with analogue vibrations. A drummer’s (and other musicians’) “feel” of rhythm is something that defines them, do they hit on the beat, maybe a little before or after? Quantization makes sounds become homogeneous, the kick drum needs to breathe sometimes or hit a note off-beat, and quantization removes a bit of the organic nature of the instruments.
Setting Up Your Recording Session
Preface
When traditionally recording with a microphone, one needs a quiet room to record. The clock ticking or the fan blowing can disrupt your recording session. Not with direct-in recording. The goal is to get as unadulterated a tone as possible, and direct-in does it best without interference. The TV won’t get picked up, but you being distracted by it could be evident in your playing. The kind of microphone you get and its positioning setup bring in so many variables that it can make you go crazy, it’s why there are pros who mic up rigs for live shows or recording sessions and that’s their sole job. Maybe just a little off the grill 2.3mm, and 3.4in off the center to the upper-upper right, cuz every other direction makes it sound like farts (I’m being a little facetious, but it really can get intricate like that for some people.) In both of those situations, there will be an audio interface in the mix routing the ins and outs of the venue’s/studio’s sound. For this scenario, we want to minimize distraction, noise won’t be as big an issue (though there are some pickups/electronics that might pick up the sound of radio frequencies, certain light bulbs and even voices.)
Do Hardware First
Connect you cables in and out to where you want them to go and come from.
Connect the USB to your computer, and get your drivers to make the unit familiarized with your system (type in the model unit you have on your preferred search engine with the word “driver” and look for a link from the company that made your unit, there can be some sneaky people messing with what one thinks are legit drivers, verify your sources. Though sometimes it can be configured automatically if it uses a common driver.)
Connect your preferred output source, from the unit to your choice for output (headphones, monitors etc.)
Then get your instrument hooked up to you the interface. For the driest signal you connect your instrument directly to your audio interface. If you have pedals, put them in before the interface if that’s how you want to record. You could also be sneaky and put your effects AFTER the interface unit so you can hear the sound rigged out or for reference of around where you want to go, but record with a clean direct-in before it hits the pedals. Something to consider is that you will need to make sure your unit can push the pedals adequately enough.
Software Setup
Installing most programs follow the same steps. If you found a program and have trouble installing it, the program’s site should have a page with directions to install and do the initial setup. In the initial setup you can choose your audio interface then to link the hardware with the software. We’ll look from the point of a program already installed and you want to setup your interface you added after you setup your program.
The kind of program we want to work with, if we want more than simple record, stop and minimal editing options, are called DAWs (Digital Audio Workstations.) Look into a DAW that works with your operating system. Some computers come with official recording software like GarageBand for Macs. You should give a couple a try, sometimes the first one is a little too deep to begin your recording journey with.
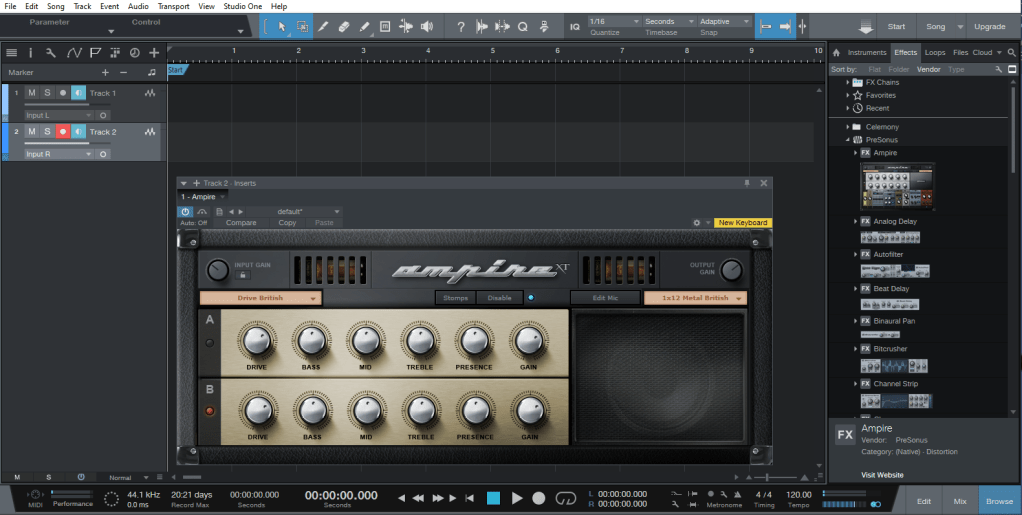
The one I am using above is StudioOne by Presonus. It’s an outdated version, but the functions are good enough for me. In the image I have an amp simulator that comes with the DAW. This is where going as dry as possible is good. Your manipulation can be done through the digital amp in the DAW. There has always been the debate between analogue and digital for music, but in the modern times, digital amp technology has made tremendous progress. The one that comes with your DAW is usually a little basic, there will be some add-ons you can get for a better tone, but as someone starting out, the one you have access to is perfect for the moment. The minutiae between 16-bit and 32-bit may not be apparent when you’re starting off, though you may need an amp sim with more gain and compression to do some chugging. A Jazz chorus type amp can’t hit the death metal tones you want without assistance or modifications like an Engl or a Mesa-Boogie sim can. The goal of amp sims is to simulate amps. Messing with what comes with your DAW can introduce you to a whole world of amp characteristics. They might have a weird name, but the company making it usually alludes to the actual model being modeled after, or might have a list describing the inspiration for the model in the DAW.
Levels Setup (Pre-Amps)
When we started, we were talking about getting a good core tone. Your audio interface might have an LED to let you know when your input is clipping/distorting (mine has LED lights with the word “Clip” over the knob for each input’s volume (labeled as 1 and 2 for each input)). This variable is known the pre-amp, because these “core” settings are what is going through the amp sim in the DAW. Start too distorted for the “core” tone going in to a simulated distorted amp can make for too much distortion for note clarity in the end result. I like to have the interface’s input level heightened so when you hit the strings with your hardest hits it will barely clip, but not when playing softly. You need a strong signal to get the most out of your recording and the dynamics of your playing, while avoiding the clipping/distortion.
Start Recording
You got things set up now! Press record and make lots of mistakes, but learn from them. This start is for you to get experience, your first track sounds alright now, then when you develop as a musician you will see your progression before your own ears. That first one you made probably really wasn’t “alright” but it’ll hold a special place in your heart. Don’t be scared to record an idea, keep that project somewhere to come back to later on to develop it. Many bands have songs written that they don’t put on an album until years and other albums later, working on how the heck an idea they came up with can be completed. They are also working on something that doesn’t come out until they are confident in it, but they continue. At the very least, that terrible idea can be stored on a flash drive, and then throw the flash drive in a drawer never to be seen until you clean out, check out what’s in it and be amazed at the thought in that moment of time.
Learn Your Program’s Functions
Every program tends to have the record and play buttons front and center, but every program can do more than that. Learning to do splits and cuts will help make your music more cohesive when it’s exported from the DAW. Learning your DAW will help create the music with all the flourishes you have in mind come into fruition. Back in the day, a cut in the track involved real scissors cutting tapes, leaving things on the “cutting floor”. Now you just point and perform the action in your DAW, no dangerous sharp utensils needed.
Coming Soon
Effects- I will go into detail of the nature and philosophy one can take in adding effects into their signal chain. With some posts that will focus on specific effects solely.
DAW Actions- I brought up cutting and splitting, I will go over some of the specifics in how to approach the finer details of your recordings
In photography, you consider variables in the “Exposure Triangle” to make sure your shots are not too dark and not too bright, but at a good balance. Exposure is the balance of light and dark in a photo. The brightest and darkest spots, together, make up the dynamic range of the shot, some cameras have a wider range than others. A shot will definitely be too bright (known as being “Over exposed”) when there are spots in the photo that are at or nearing white, where there really isn’t, and is dark (AKA “Under Exposed”) when spots of near or absolute black appear, where there isn’t.
The Exposure Symbol
The symbol above is the exposure symbol, you’ll see it when your photo is balanced (in terms of light), according to the computer inside the camera detecting levels. You’ll also see a gauge that tells you how far off the “equilibrium” for good exposure you are.
Over and Under Exposure
Over Exposed
Under Exposed
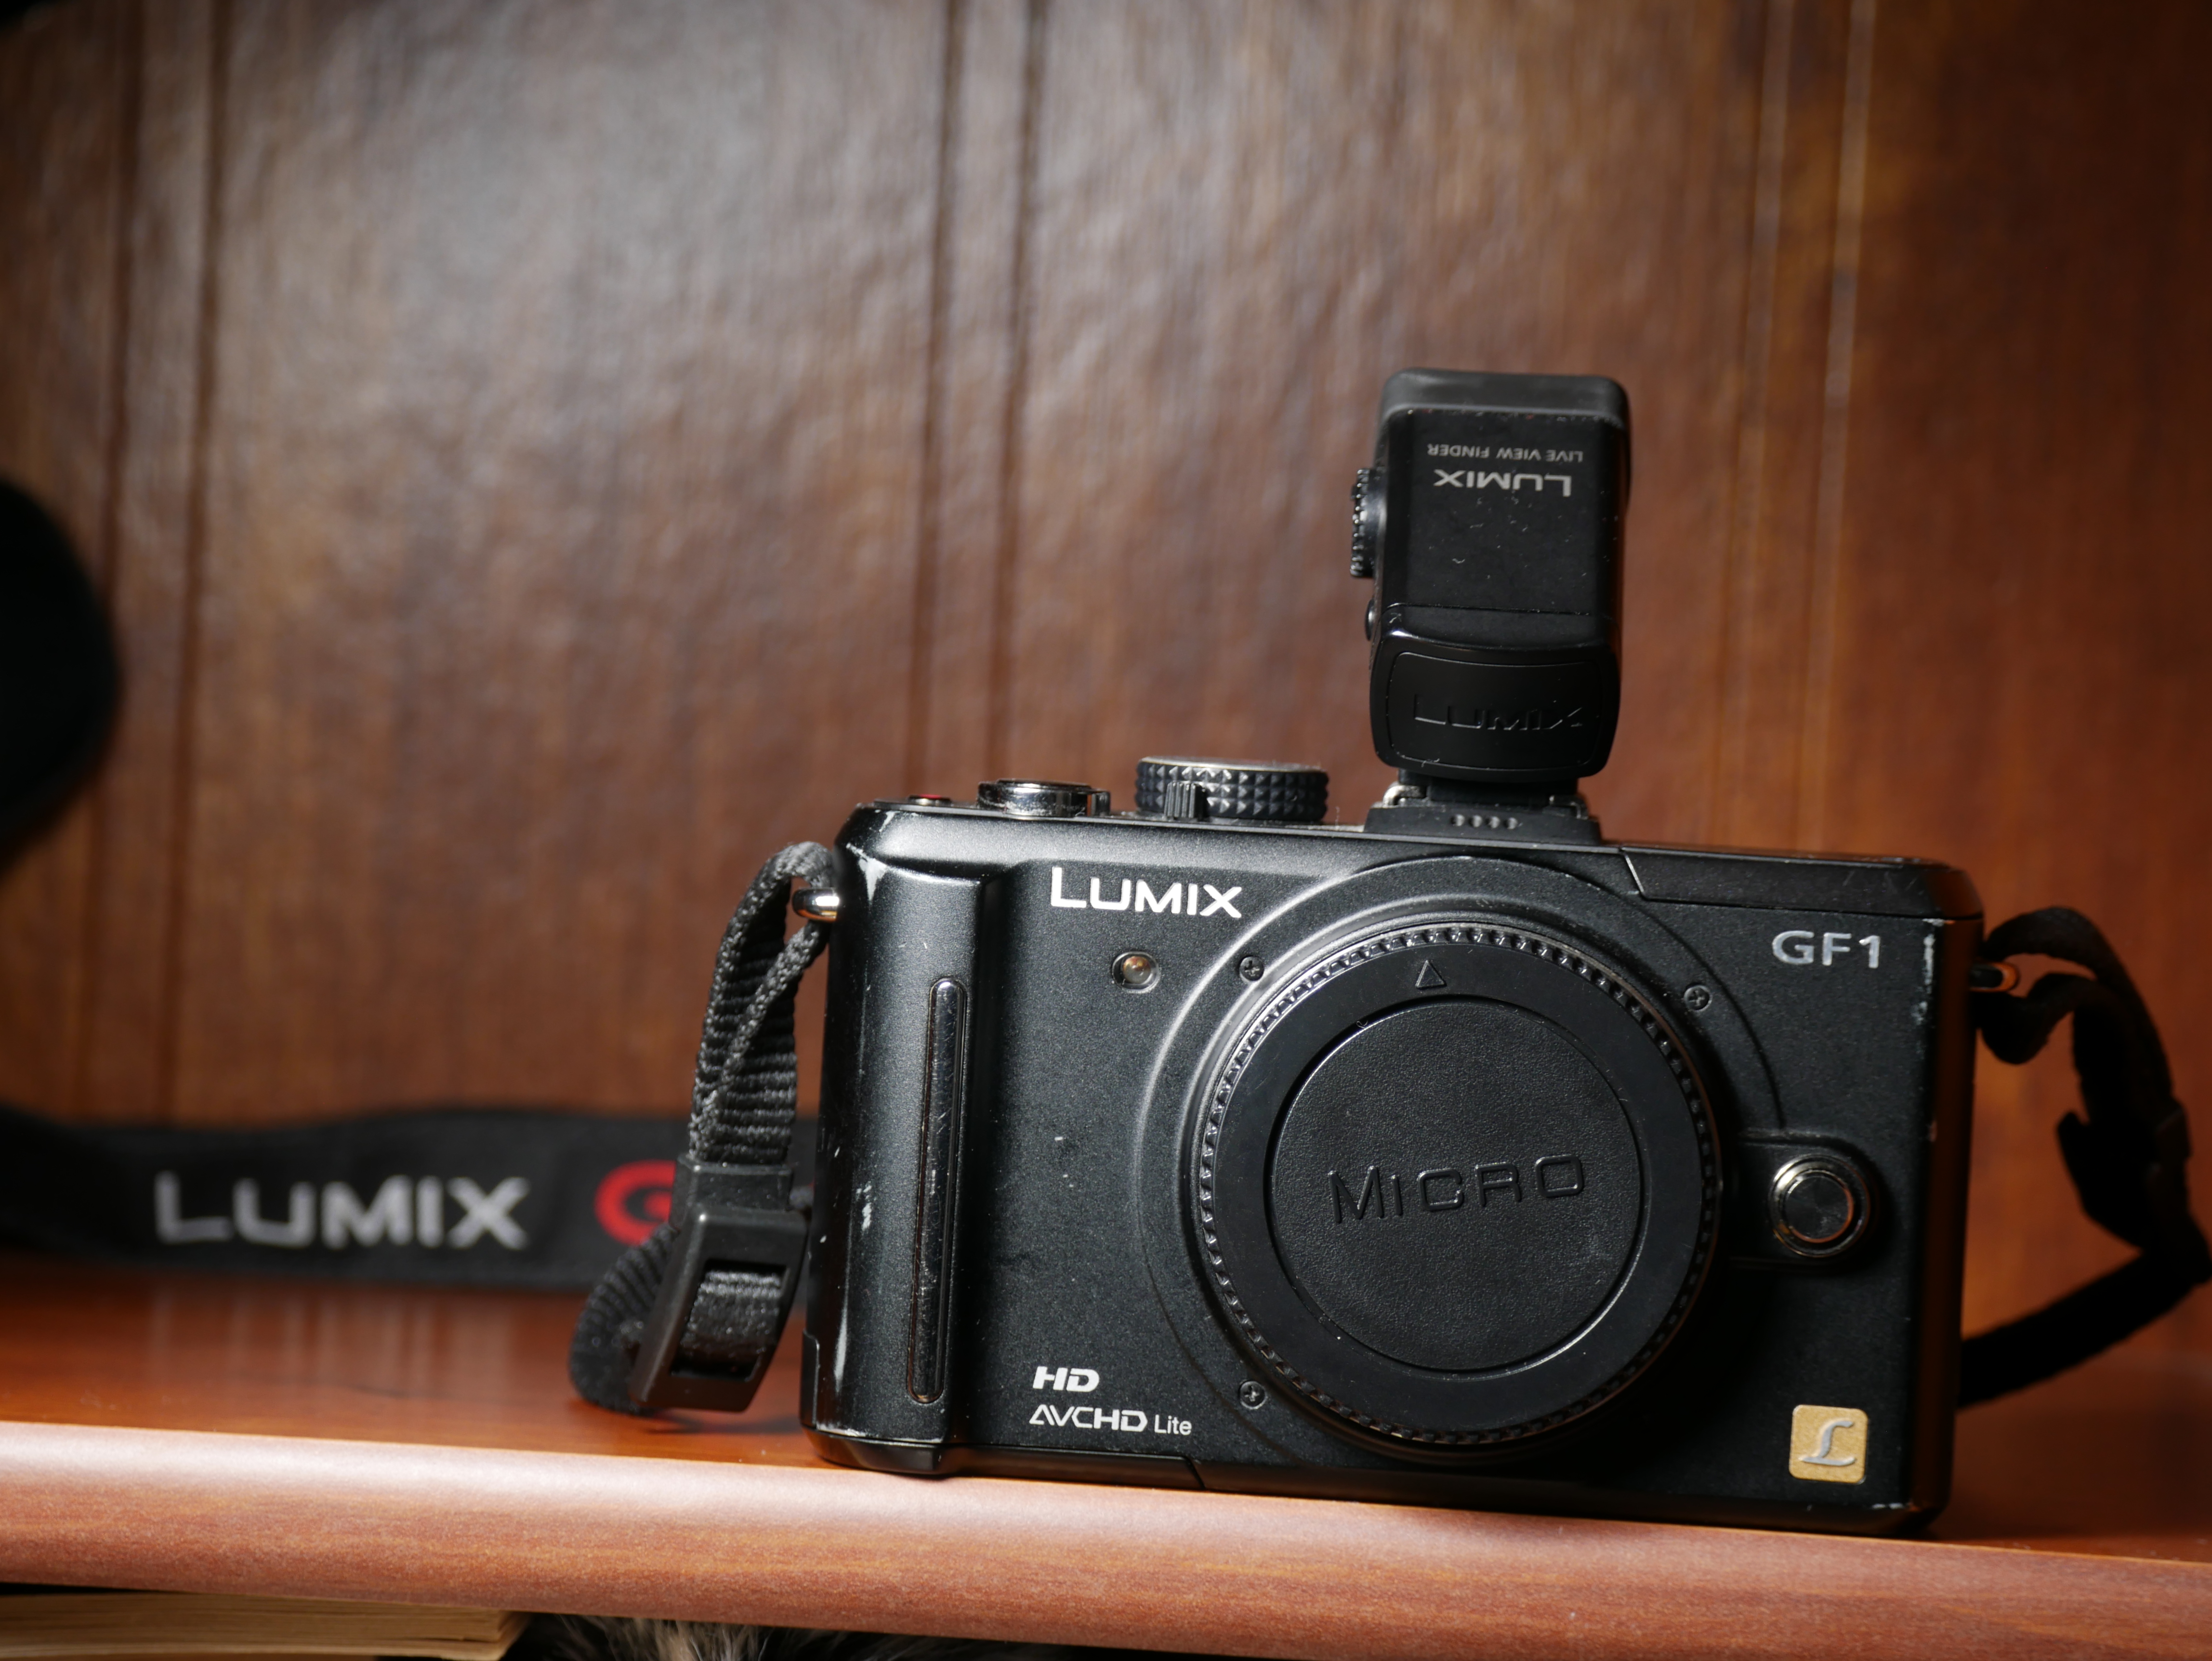
The photo here on the left is a photo that is Over exposed. The background, in real life, is dark brown, but my settings made me blow up the colors. Even the black camera looks more grey. These same settings would be working well if I removed the light source, maybe…
Now, here on the second image we have settings that make the scene seem like there is no light source. We are almost left with only being able to see the whitest parts, like reflections and the LUMIX logo. This photo is very much under exposed. The same settings here would probably work outdoors in optimal sunlight.
Something to note is that in both images, the lighting, in real-world, was EXACTLY the same. You’ll see it as it really is supposed to be later in this post. The only changes made were internally with different settings. Those settings are what we will be talking about today.
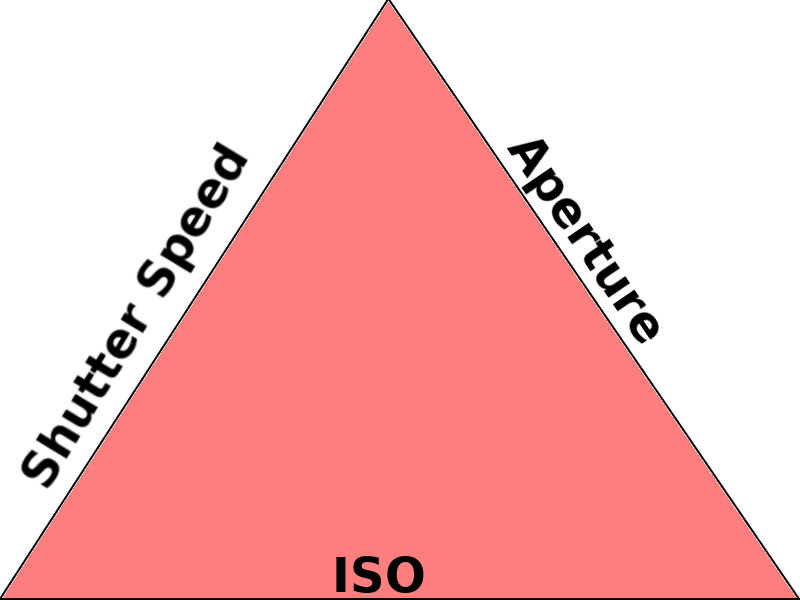
Exposure Triangle
The Exposure Triangle!
The idea of working a concept in the triangle tends be done with the idea of “choose 2 out of three”, but really is about the balance of all three aspects. Think of it as a weird triangle plate standing on a pole (for some reason, like one of those circus shows with the balancing spinning plates, but here, there is no spinning since we want to put things on our plate, it would fly out if we were to spin it, don’t be silly.) The plate will stay on the pole when you put an even weight throughout the plate, to reach a sort of balanced equilibrium. One section is your grains, one is your protein, and one is your vegetables, it will make your meal, but for some reason food tastes best when it balances well on a plate on a pole, who knew the secret to good food had gravity involved. Putting too much on one side, compared to the others, will tip the plate over and no more food for you.
The idea of each meal translates to each photo you want to take, it’s about the balance for your product (whether the plate of food or, in our case, the photo.) Instead of the foods we want balanced, we have the factors of photography Shutter Speed, ISO, and Aperture to consider the variables of. A fallen plate is a photo that is over- or under-exposed. That’s due to how you balanced the factors. So just put some of one and some of the other and a sprinkle of the third and get your photo, and you’re done, right? Well each of those variables do more than just make photos brighter or darker, though they do by the very nature of how they work, it’s not the “main goal” of the variable. However, depending on your shooting scenario, it may not be the priority of your shot. Sometimes it’s too dark and you need to compensate one of the variables to try to get a usable photo… sounds scary at first but it will be cleared up by the end of this post.
Shutter Speed
A photo with slow shutter speed (2 sec)
You know those speed lines comics have to show speed? Well the motion is replicated in real life photography with a slow shutter speed. What’s shutter speed? It’s the time it takes for the camera’s shutter to close. The time is how long the camera’s sensor is absorbing in photons (the transference of what you see, to capture in the camera, is done through light (photons) just like your eyes, since everything you see is really a reflection of light. You really don’t need to know the science, just know the result of different variables). You tend to see it as 1/x (ex 1/60), where the x is another number to mean it’s 1 __th of second, or as whole numbers like 1′ or 4′ (it can go up to however long you want with certain settings), which is the number of seconds it takes for the shutter to close.
In the picture above, I had the camera set up to take a 2 second shot (2′). In that 2 seconds lots of people were moving, but some stayed still. You can tell by how Sharp subjects/objects in the image are compared to the blurred outlines. The plants on the top left and the dude on the bottom are sharp, as are the speakers on the top right and some people scattered around. The plants had barely no wind so it was static, the guy was busy on his phone, and non-sentient speakers don’t move, they all stayed still during the 2 second duration. Throughout, you’ll see blurry people. Those people were moving around in the 2 seconds.
There’s a car in this picture
An idea to have in mind is a painter painting a cloud. The problem is the painter has poor memory and can’t memorize the image the whole time it takes to draw in all the details. The painter starts painting and it takes them 30 minutes to complete it, the other problem is that a cloud tends to change shape pretty quickly. Almost every time the painter looks at the cloud again for reference, it is in a different formation. Working on a single canvas, with bad memory, will result in an amalgamation of the different instances of the cloud the painter saw from the beginning since the painting isn’t of a single point, but of a string of time. When taking the photo, the shutter speed is how fast a moment the painter has to capture an image. The canvas is the sensor. The result for both is an image!
When working with sports and other fast moving subjects, you need to shoot faster. The “painter” (sensor) should try to catch the moment of action, go too slow and it will be only blur, going fast will let you capture the movement as sharply as possible
These 2 photos were taken within a minute of each other!
Messing with the shutter speed does affect the motions captured, but it also affects the amount of light captured. Stare at the sun for too long and you’ll burn your eyes, it’s too much light hitting your eyes. Shooting too slowly leaves your sensor exposed to light for longer, that’s why faster shots end up making your shot darker and under-exposed, while slower shots absorb more light and can cause your photo to be over-exposed. The slow shutter speed was open for longer, making it hungry for all the light there could be! There’s one light in the top left area that looks like a sun in the slow shutter speed. It absorbed all the light it could find, scouring the landscape. It took too much light from real light sources, but showed the parts that had little to almost no light as though it was daytime.
Another use for a slow shutter speed is in astrophotography (photographing the skies.) Sometimes staring up in absolute night you’ll see pitch black sky, but your camera can see more. Something to remember is it takes a little more than 8 minutes for the sun to reach the earth, a star is much further, so it takes more time. Set a camera with a proper shutter speed and things your naked eye couldn’t see would be visible on the camera. As a city slicker, I have to put up with light pollution. Light from the city affects our ability to stare at the stars, they’re still up there, just covered. The camera is wanting to absorb any light, and the pollution dilutes a clear path for the light from beyond to reach your sensor all those millions of miles away.
Aperture
Next up is the aperture variable. The body of the camera has the shutter, but the lens has the aperture hole. The value you put is for how wide the hole in the lens is for light absorption. This variable helps alter the range of depth of field. The value is usually written as something like f1.7, but the value is really f(1/1.7). That means that the value shown on the camera’s info display may show a larger number like f11, but that value is actually less than f4. Those numbers are the defined measurements of the opening in the lens. Like with shutter speed, their value also affect the amount of light captured, wider openings lead to more light compared to the smaller aperture. So f11 gets less light than f1.7.
In the next images I have stayed in the same position with the same point of focus, on the camera. The main differences are in the settings, the priority of change in these photos are in the aperture. I say the priority of change because of how the triangle works. I moved the aperture setting but that forced the balance of everything else that needs to be altered and, therefore, readjusting the image itself to the same level of exposure. The full settings don’t matter, but if you want to see the data of photo 1 and photo 2, check out the links and click on the EXIF data. (what’s EXIF? It’s just the saved setting taken to take the shot like your shutter speed, aperture, location (if using something with gps like your phone), date, and ISO among other details, almost every photo (and digital media) stores data beyond the visual (aka metadata))
Here is an image with a large aperture
Now we see the first photo. It was taken with an aperture of f5.1. You’ll notice the camera is sharp and so are the letters and on the camera body. However, the strap behind (with “LUMIX G”) is blurred, so is the texture and lines of the background. Our range of focus is kinda limited to the space the camera takes from the lens of the camera taking the photo to the most back of the image, everything behind the camera is blurred, and if there was anything in front, so would that.
Aaand then… there is the second photo, which was taken with an aperture of f22. There was no readjusting of the focus ring, I personally like using focus lines to tell me what is and isn’t in focus and saw the outline remained around the camera in the shooting screen between shots. So while still focused on the camera, our range of the depth of field increased. It brought out the details of the background. The lines are more defined and so are the textures. When before you couldn’t see what was on the strap, you could read it in the next photo with the “high number” aperture (remember, it’s a higher number but a lower value.) Something to notice is that while the depth of field widened, the point of focus lost a little bit of detail. It’s very subtle but the “LUMIX” and “GF1” on the body look a little sharper on the first image than the second. There’s always something to lose when you gain something in your composition. You can’t get something for nothing. You sometimes may need to consider that aspect too.
ISO
Now we are at the ISO. Before we came here, the variables we were adjusting were “analogue”. What I mean is their effects are physical, widen or lessen the hole in the lens or adjust the speed of the shutter. With ISO, it’s digital image manipulation… technically. Its goal is to brighten up shots that the mechanical/analogue can’t reach a balanced exposure with. It “guestimates” colors that are too dark, it’s why high ISO leads to a “smudgy” image. The sensor got what it could so now it’s up to the ISO algorithm to boost up what it couldn’t catch as well. The photo up top was taken with a pretty high ISO.
It may not be too apparent, because JPEG images include some sort of color adjusting and sharpening, but in the RAW format it was more visual. RAW images take the flattest and “truest” image the sensor is absorbing, JPEG does a little touchup. Most people don’t care about the little details, but others want the ability to work with as pure an image as possible. The boost in a color a camera’s JPEG system codec is something some people would prefer to do on their own in post. This is going more deep into the software side of things and not really needed to understand yet, or ever for some people. I personally do JPEG + RAW since I never know if maybe I took the perfect shot, without knowing, and later on in life could go deep into touching up and editing. It’ll eat up storage in your card but it’s an option. If your camera has the option, set it so it’ll capture both and you’ll see for yourself the difference. It’ll take every photo in both formats. I haven’t posted a proper RAW file since I haven’t found a place that will let me host it. I will have a post on settings beyond the triangle in future.
So What Order Do I Start Adjusting??
Water flowing with a slow shutter speed
Every scene/scenario has an optimal focus and different factors to consider. You’re taking a picture of a waterfall, do you want to capture a single moment and catch droplets falling, or do you want that traditional “soft” looking waterfall style that is typically used? That’s where you want to start working around the shutter speed and adjust the other parameters to accommodate the shutter speed making everything too bright or dark. Sometimes you may be doing a portrait and just want the subject to be in focus, ignore that cool stuff in the back. In this scenario you will find yourself working with the aperture being the core goal, and working the other variables to expose the image correctly. When do you want to use the ISO variable as the variable to make everything else go around it? I say, don’t. It should only be your core if want a certain type of “distortion” in the image, but you could get more control of that in post. It’s easier to blur things up than to sharpen a photo.
Waterfall with a faster shutter speed
Is There Some Sort of Shortcut?
The PASM knob
In the previous section we were talking about using a function as our “core” variable for the scene. You want blurry motion, so set your shutter speed to how much you want and adjust the rest of the settings around it to reach an adequate exposure. That’s a lot of work for a “simple” shot I want. Well that’s why there are different modes on the dial of the camera. It’s known as the PASM dial (PASM is an acronym for Program, Aperture Priority (Referred to as Av on Canon), Shutter Priority (Referred to as Tv on Canon), and Manual.) You can see the letters on the photo going up. The other options are camera dependent, this one has various auto modes, a movie mode and custom modes. In shutter priority mode you adjust the shutter speed you want and the exposure level you want the image at, and the camera system fixes everything else to reach your defined exposure level. Usually it will be the one other “analogue” variable if you don’t have auto ISO on.
An important thing to remember is that A is Aperture Priority, not Auto. It makes total sense, as a beginner, that A would be “Auto” but nah. The P is program, but it means program auto. P is what you want for the camera to adjust automatically to the scene without fiddling with parameters.
Jumping to ___ priority modes are a great way to get into working with your camera and learning the effects of your variable changes. Take some terrible photos and learn why it sucked, usually your hands probably weren’t steady enough for such a slow shutter speed, go a little quicker, or put the camera on a stable object like a table, chair or a rock, or lean on a wall, though a tripod is always preferred, it is not the only solution. Learn, make mistakes, and learn some more!
TLDR
Shutter speed = how fast the shutter closes. All about the motions
Aperture = The size of the hole in the lens. Mainly about the range of the depth of field
ISO = the digital brightening of the image. Kind of a last resort/variable to mess with
PASM gives you the shortcut so you don’t have to manually adjust 1-3
PASM is an acronym for Program, Aperture Priority (Referred to as Av on Canon), Shutter Priority (Referred to as Tv on Canon), and Manual
Coming Soon
Recommended Settings- I’ll have some recommendations on how to make your camera easier to read and use.
Compositional Fundamentals- what to consider to get what you want in the shot. Working with zoom lenses vs prime lenses to benefit your shots.
Fundamentals of Videography- It’ll be like this but more images per second
Using the Drive Modes- We’ll learn about using timers, time lapse photography and continuous shooting, among others.
Priority Modes (In Depth)- It might be good to understand how everything is supposed to revolve around the “priority”
The Painter and The Photographer- how can principles of one can affect your understanding of the other. Realism vs surrealism.
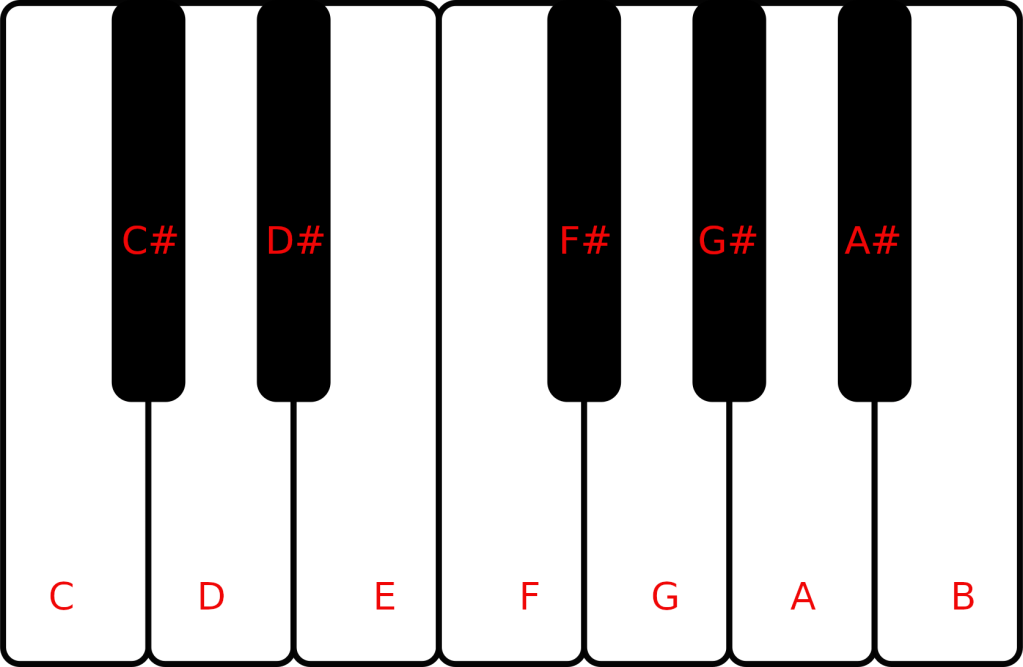
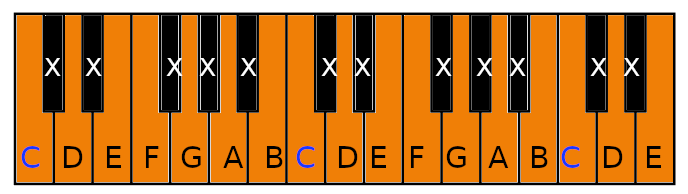
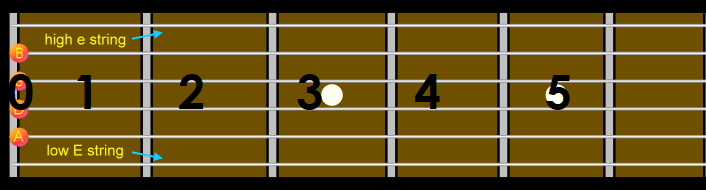
So the title of the post may seem wordy and a little scary, but the visual connection a musician can make with the notes is to see the pattern of the lowest note to the highest. After A is A# then B and so on… on guitar there’s the idea that you can hit the same note in more than one place, the C4 you want to hit can be on the 8th fret of the low E string, or the 3rd fret of the A string. That concept can distort how you imagine notes, not knowing the instrument, you might think you’re higher up the neck, therefore the note should be higher. That idea isn’t translated perfectly on the guitar, but it is when thinking about the piano, only one key is the C4. If you want to hit the note, you have one option. Going one key to the left is a B, one to the right is C#. Go to the right to go up in pitch, and to the left to go down in pitch, it is an absolute rule when working with keys, whether a piano, a xylophone, marimba or even a kalimba. It’s simple and logical.
Keys with their notes
On guitar, your motions doesn’t equate to the same shift per change, move one fret up or down on the same string of the C4 (the first C on the low E string in the image below) and you’ll get B3 or C#4. However, moving up a string throws logic as you know it out. Now you’re hitting F4, that’s not how the twinkle twinkle alphabet song says sequential letters should be. Going up one should be “one more up” at first thought. When your amp says it goes to 11 instead of 10, how much louder is it? Well, it’s one more louder, and that’s great. In music, our unit of measurement is through steps. One half step from C is C#, one whole step is from C to D (can also be thought as 2 half steps, adding with fractions comes back!) With the simple math, 3 half steps away would be 3 keys offset from where your root is, while 2 whole steps would be 4 keys off.
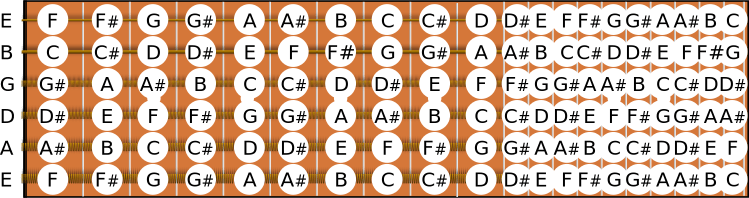
the guitar fretboard note anatomy
On guitar, going up a fret is a single step, but going up a string is equal to 5 steps up. (Generally, when talking about steps, the term “step” used on its own, like in the previous sentence, means a half step. I brought up the full term as “half step” to show the topic, but “steps” are generally how they’re called colloquially. When it’s specifically a “whole step” it’ll be clarified as such.) Going from the C on the Low E up a string gets you F on the A string. That same note is on the 13th fret of the low E string. A linear approach on guitar could be seen from a fret by fret basis, for now, through a single string. Later on in your musical journey, the whole of the image above will be second nature to you and you’ll be able to navigate the fretboard more fluidly through all your strings.
Too Much Guitar, Give Me Piano Stuff
That whole part before was just to show the nature of the note orientation and instrument relationship, and the pitfalls that can occur when trying to directly transfer over your musical understanding to the other instrument. I can already hear you through your screen that you wanted to see some piano chords and scales, well lets gets started…
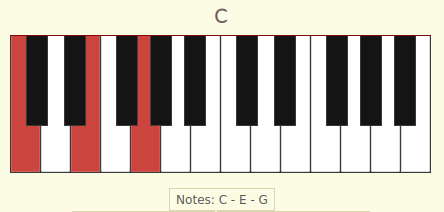
Your C Major Chord
Above is your first chord. It’s a C Major chord. A chord can be defined as the playing of 2 or more notes at the same time on the same instrument (when it’s on different instruments it is a harmony.) This particular chord is defined by the notes listed below: C E G. The “Major pattern” has the root (C, usually the first most left (lowest) key of the chord), three keys offset (known as the major third in theory terms, and E in this case), and 7 keys from the root (2 from the second note) to give you the Perfect Fifth, G. I brought up fancy terms like the major third, and the perfect fifth. Those are terms to orient your playing to a certain defined key and create defined voicings that can be shared academically. The patient knows they hurt their arm, but the doctor knows they hurt their ulna, they note it on your record so the next doctor looking you over knows the issue. Sometimes you augment your chord and need someone you’re playing with to play that very chord; you’re on guitar and can’t just say “hit the 4th fret instead of the 6th” to someone playing a piano. Those technical terms help you tell other instruments what you are playing and what you have in mind for others to play. When you’re moving around the keys to hit another major chord, your hands must follow the pattern to be defined as a Major chord.
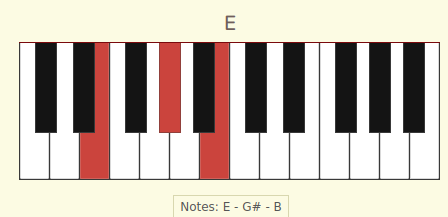
Another Major Chord
Above is another Major chord, but an E Major chord. It is made up of E G# and B. The way I brought up shapes and chords for guitar do not work the same way for piano, though the fundamental theory still applies. The shape here is built on the same foundation as the C Major: has the root (E), three keys offset from the root (G#), and 7 keys from the root (2 from the second note) to give you the Perfect Fifth, B.
Scales
So I’ve brought up chords, which are a group of notes, with a defined structure/voicing that are played simultaneously. Scales, on the other hand, are a group of notes that are played sequentially.
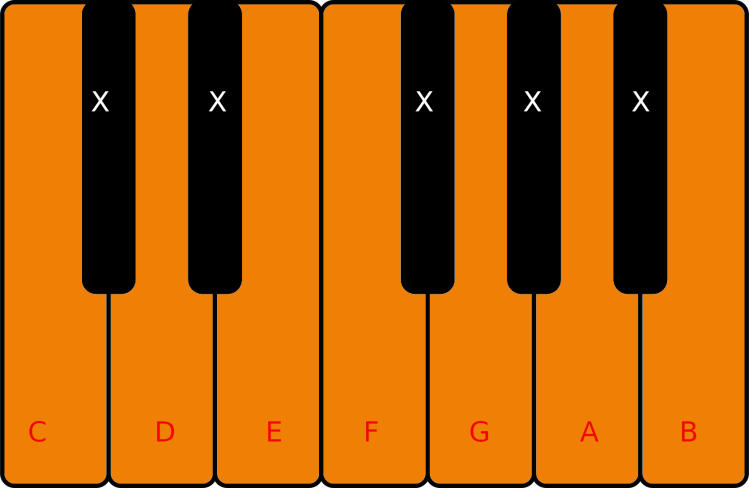
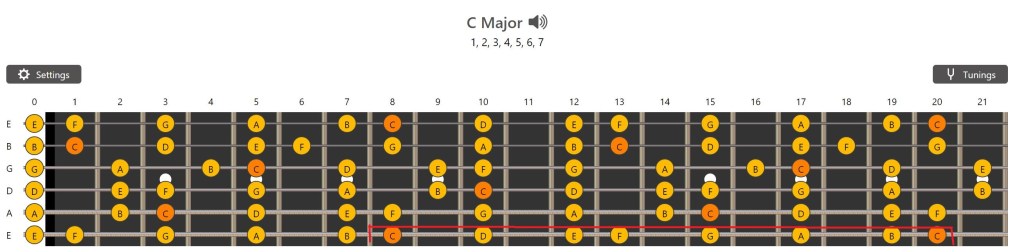
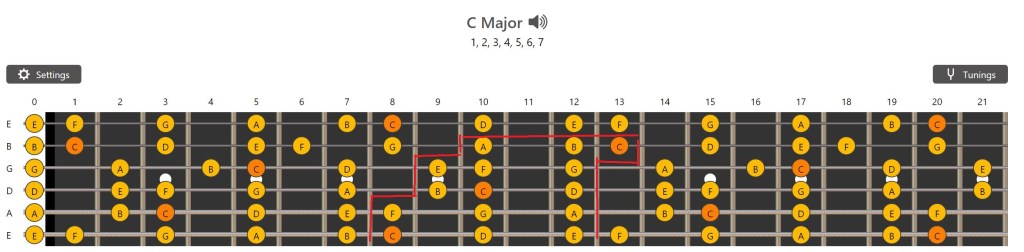
C Major Scale
The Orange keys are played, while the X’s are skipped over. The C major will always comprise of C D E F G A B, no sharps in C Major. The pattern behind the notes is: from the root you go 2 steps/keys over to D, another 2 steps/keys to E, 1 step/key to F, 2 steps/keys to G, 2 steps/keys to A, and 2 more steps/keys to B before hitting the next octave C to start the scale for the next octave. This pattern means you can swipe your hand on all the white keys and you’ll be playing C Major!
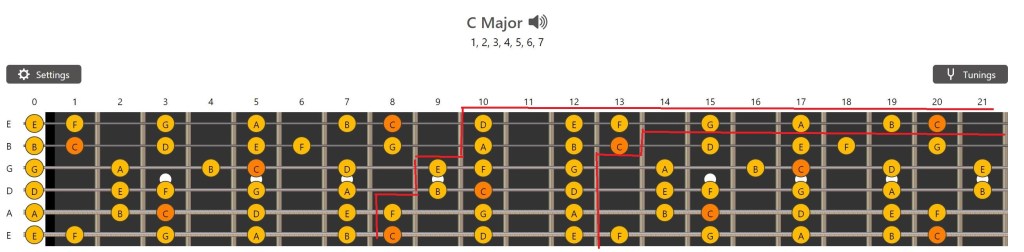
C Major Expanded
The above is how to push the C major beyond the same range to use more of the keys. The scale is a cycle and is being repeated each time you hit the C again. Each C you hit is in a different octave and the start of the rest of the scale in that different octave, with the same pattern.
What’s the Relationship?
So we went pretty deep into what makes chords and scales the scales and chords they are, but what’s the relationship??? It’s a pretty simple but powerful truth in music theory. They are both defined in their own terms that make them unique, but only one fits in the other. The main point is that the pattern of major chord leads to notes that fall within the major scale. Fall out of the pattern and it won’t be a major, though there are some overlaps in structure with other chords in different voicings. The circle of fifths gives a good intro of chord pairings, which will be discussed more in depth in the future. This is the connection of relative minors. As a little teaser, the A minor scale looks very familiar, what the heck?
Think about scales as a dictionary with a set number of terms. The limit of the terms dictate what can be in sentences. The words can be arranged in any way, be abstract and a seemingly weird phrasing makes perfect sense in the context (the phrase “..and that’s why clown shoes saved my life” needs context), or be predictable and stable on its own (the phrase “the floor is beneath me” is always true.) The words are notes, with sentences being how the notes are strung together. Sometimes creating a limerick has you thinking weird words that don’t make sense since your focus might be on the rhyme scheme. The confidence to hit a “sour note” lets you explore ideas. Your goal is to create, and sometimes having some core limitation to base a starting point off of can help you start some exploration in musical ideas
Do you build to solid structure like a skyscraper with rigid corners towering all the way up, or build to the organic environment with shapes that may not follow a ruler all the way through? Your approach to the shapes you see define you as a creator and musician.
Shapes? Shapes? Shapes?
Here the shape isn’t visual, but a theoretical shape. I call it a shape, but it’s the pattern for chord or scale type. The shape doesn’t pop up as consistent like on guitar, but the theory behind it is the shape/pattern that defines the chord or scale.
Major “Shape”
Scale: from the root you go 2 steps/keys over, another 2 steps/keys, 1 step/key, 2 steps/keys, 2 steps/keys, and 2 more steps/keys before hitting the next octave root to start the scale for the next passage
Chord: has the root, three keys offset from the root, and 7 keys from the root (2 from the second note) to give you the Perfect Fifth.
Both of them Together
C Major Scale with C Major Chord highlighted
Seeing it In Another Scale and Chord
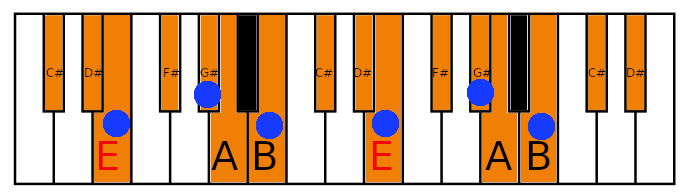
An E Major Scale with E Major Chord Outlined
Up above is an E major scale with the chord shape laid out. The same notes are used in different positions, since that is what defined the chord as such. Piano keys just repeat the 12 keys for each octave range, the form remains the same in their respective octaves.
Chords in Words
Look at them chords
E Major: has the root (E), three keys offset from the root (G#), and 7 keys from the root (2 from the second note) to give you the Perfect Fifth (B).
C Major: has the root (C), three keys offset from the root (E), and 7 keys from the root (2 from the second note) to give you the Perfect Fifth (G).
How about them Scales
E Major: from the root (E) you go 2 steps/keys over (F#), another 2 steps/keys (G#), 1 step/key (A), 2 steps/keys (B), 2 steps/keys (C#), and 2 more steps/keys (D#) before hitting the next octave (E) root to start the scale for the next passage
C Major: from the root (C) you go 2 steps/keys over (D), another 2 steps/keys (E), 1 step/key (F), 2 steps/keys (G), 2 steps/keys (A), and 2 more steps/keys (B) before hitting the next octave (C) root to start the scale for the next passage
Review
In the end I want to really instill the idea that chord and scales follow forms that define them as such. You can modify any chord however you want, but it may no longer be a major chord. Definitions are absolute, but, just like words, you sometimes make some shiznit that ain’t “real words.” Even though there are “rules”, you have the freedom to change what you see to what you want to hear. If you make up a word with no relatable root then it’s nonsense like a zoopity toop, but you may recognize the word shiznit is going around. Those tweaks are how you can approach your “chordal tendencies” (another word I made up (I think)) and their roots, but it shows to not fear making nonsense, so long as there’s something keeping it rooted. When you get comfortable, you’ll be able to make nonsense that needs context that you fill in yourself, which is really what makes a composition complete. You’re making a new language, as crazy as it is, as long as you define patterns and rules you can make your own nonsensical language, will anyone understand? Nah, but you made it. There is a difference between avant garde and just plain chaos, it’s a thin line, but soon you’ll have fun riding the tightrope between the 2 on a engine powered unicycle over a shark tank with lasers.
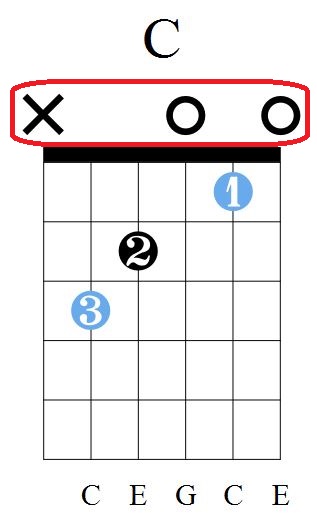
Up top is how most books (remember those?) or other places/sites express their chords. There are a couple symbols, shapes, numbers and grids, with some letters at the bottom, what does that stuff mean?
Before we begin…
You may ask: “What’s a Chord?” Well it’s 2 or more notes played simultaneously on the same instrument. As far as I know, only multi-stringed instruments can play chords (guitars, violins, banjo, piano etc.), so if you’re rocking something like a whamola, no chords for you. You can’t hit more than one note on a trumpet, or a flute. In those cases, a composer spreads out the chord between instrument 1 and instrument 2 (you may have heard a musician mention getting first or second chair or something, it’s about the piece they got.) Even though they are playing the same piece, they will each have something unique in their version of the piece. The goal is to hit certain notes to create harmony to simulate a chord progression. All this is a bit more advanced to read just starting out, but the trippy part is what makes the approach to guitar be something a little different. Your guitar has a couple strings and each string can hit 1 note at a time, in a sense, you can think of the guitar as an orchestra you conduct with your fingers. Each string can be considered its own instrument. Having that in mind can make the instrument seem even scarier, but don’t fret, you’ll be conducting your guit-ymphony (a portmanteau I made up for your guitar symphony! You saw it here first folks!) soon enough!
Enough with the abstract thought experiment. Let’s get on to the charts!
Identify!
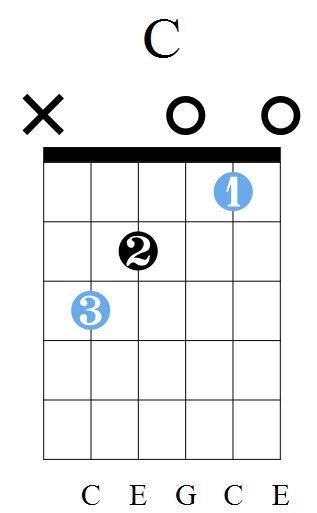
Above the figure is the letter “C”. You may have heard majors, minors, add9s or some variant to express chords. The most common “base” for chords are Major and Minors, I say base since there are many variants of chords based on the origin, and this figure is a major chord. In this example, and most commonly, you won’t see anything other than the letter to let you know it’s a major chord. Sometimes it could be written as “C Mj”, “C M”, or just spelt out “C Major”.
So what are we looking at? C Major
Now lets get into the main diagram in the image, top to bottom:
Open or Closed?
Under the chord name, there are 2 symbols over 3 spots, an X and 2 O’s. This is about the concept of open and closed notes. I talk about open notes HERE, but it is just the note that rings out when you aren’t holding down a fret (also discussed in the same post.) The open notes are shown with O. Then there are closed notes, X. With those, you need to think about keeping the potential for vibrations to ring through the strings “closed.” The symbol means to try to avoid the string ringing by your preferred method (some people use their thumbs for blocking the string (reaching over the neck), some use the skin around the fingers, or more precise picking technique to avoid hitting the string, whatever works is a method you can use)
These symbols are right above the string the motion is applied to, in this case the X is over the low E string, with O’s over the G and high E strings (the concept of tuning and their strings can be found HERE.)
What’s the fretboard looking grid thing?
Under those X’s and O’s you may see on a chord diagram is a grid. The grid is like drawing stick figures for people but for the guitar’s fretboard. It doesn’t have to be the most elegant looking so long as it has the basic shapes that tell you what you what it is. Something to note is the visualization is of a right-handed guitar as you’re staring at a fretboard head-on, from left to right is the thickest string (lowest pitch) to the thinnest string (highest pitch) on the right.
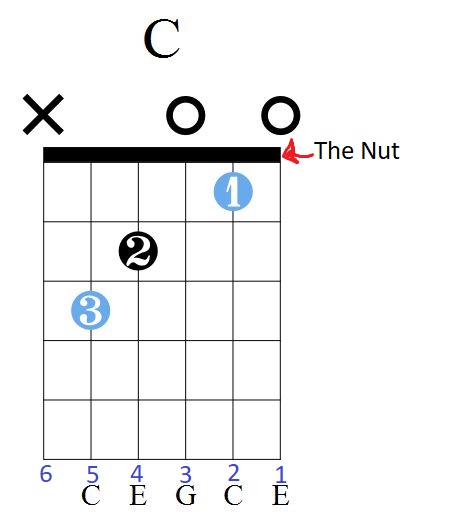
figure with strings and nut noted
The most top part is a thicker line, that represents the nut, that’s why the X’s and O’s are placed above the most top line of the diagram, open notes can be thought of as hitting the “0th fret.” The symbols are there if there is no fret to press down on the string.
The top line always gives you a reference point, though it’s not always the thick/bold line for the nut, we’ll look at one of those alternatives down below, you can wait, right?
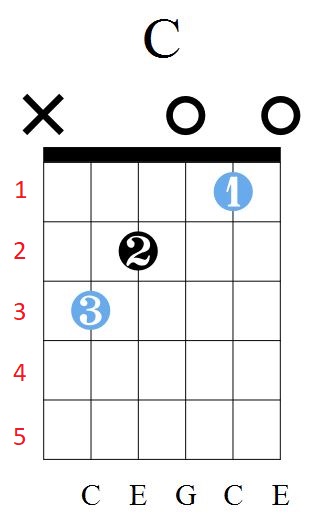
Figure with frets noted
Like a guitar fretboard, the spaces in between the line is the fret number to press down. Starting from left to right, using what we’ve already learned, we see the 6th string has an X so we skip that string. The first note is on the 3rd fret of the 5th string. Then the 2nd fret on the 4th string. An open G string. 1st fret on the 2nd string. Ending with an open high E string.
You may have noticed that there are numbers in circles where you should place you fingers. At first sight, it looks like the number is the fret number… No, no, no it’s not that. It is merely a coincidence. The number is what finger it is recommended to use. Starting with your index finger (the one people tend to use to point) is 1, your middle finger (the bird that doesn’t fly) is 2, your ring finger (the one you put a ring on) is 3, and your pinky (the one you put to your mouth horizontally when you have a gnarly evil plan) is 4. Though the 4th isn’t shown in this diagram, you will see it in other chords. But some are blue and some are black, why? The blue is the instance of the root note being hit in the chord, in this scenario it’s C. The black is notes that aren’t the root note.
wat?
Those Letters at the Bottom
So I just brought up root notes, what and why are they? Every chord has a set of notes that make it defined as such. The root note is the base of the chord. Generally, the lowest note should be the note the chord is based on, you can’t hit a C on the low E in that position, so, theoretically, it has to stay out of the equation of the chord. The low E has nothing below since no note is supposed to ring out. Then from the A string to the high E use C E G C E, respective to each string and fret sequentially.
The notes between the blue define the chord “core”. From the lowest note to the next octave, that is one instance of the chord. The core of C Major is C E G, after that, it is repeated for as much as you can. After that G it hits a C and E again. I will have a lesson like this going over reading chords for piano, with that instrument, and its linear nature, you can really see the pattern for chords and scales. (It is now HERE)
You can Do it!
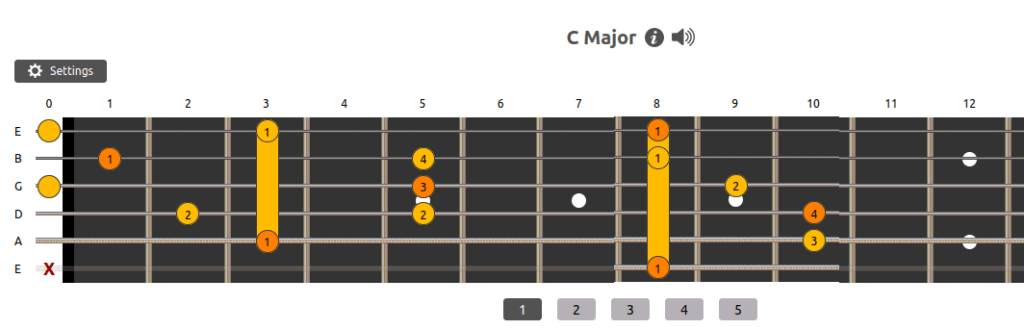
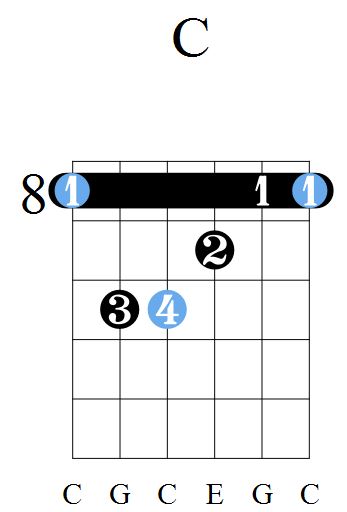
C Major Ver 2
Now we’re working with a barre chord. What’s that mean? Well you may see that there is a bold black bar over a fret that extends from the string on one end of the fretboard to the other on the other end. That’s what your finger should cover as the base of the chord. These kinds of chords require stronger fingers so don’t be discouraged if you can’t hit it at first, you need some finger strength to have the notes ring clearly (and depending on the setup of the strings (the action height) can make you have to push even harder or lighter.)
You may notice that the most top of the “fretboard” doesn’t have the nut like the chord before, that’s because this chord is in a different position of the fretboard. There’s an 8 next to the fret space, that’s the starting point for the image.
Using what we learned so far, we should be able to finger out the chord. That barre over the 8th fret is tell you to use your index finger across the whole fretboard over the 8th fret, but it should only ring over the Low E, B, and High E strings. The ring finger should be on the 10th fret of the A string. Your pinky should be over the 10th fret of the D string. Your middle finger should be on the 9th fret.
The force of your index finger does not have to be applied to every string, as most of the middle of the chord has other frets being pressed. The focus should be on where the 8th fret needs to ring out, the low E and the B and high E. There are 3 strings between the low E and the B, those have frets defined. Your force and focus should be on them for your index finger, every other sting has a single finger for it. This focus is good as you’re starting off since you need to build up strength, eventually you’ll need to get the strength to barre one fret across all strings, even doing it across the first fret. Learning how to control a barring finger lets you approach chords differently, it’s how I finger a high D Major and can transition it to a D sus2 and back using only 2 fingers, instead of the traditional 3 finger approach. Not everybody’s hands are made the same, if you can do the traditional method, cool, if not, there’s another way, or sometimes you can but you just want to try it different, do it. The experimentation you can do with your instrument to play best for you is amazing, don’t be afraid to try the unorthodox
You may notice the pattern is a little different, here it is C G C E G C and in the previous it was C E G C E. Theoretically, you could alter the chord so the G in the second variation of C Major can be E, but, due to the nature of the guitar, you can’t have both G and E to sequentially play the pattern of the chord the same way. In the end, the core of the chord is found in the middle section of the chord C G C E G C, albeit in the next octave.
Another View
Now it’s horizontal!Familiar shape?
Shapes???
So there is a very important concept that applies to guitar in its standard tuning, SHAPES. That second variant of the G looks very similar (practically identical) to the C we saw earlier. That shape can be thought of as the “major shape”. Holding that shape, using the six strings, will give you a major chord no matter how high or low the fretboard you are. The root (lowest note (the note on the low E string)) tells you the chord. Holding the shape with the root on the 5th fret of the low E means you are hitting an A Major chord. Here we have the first at the 3rd fret of the low E which is a G thus G Major, and then sliding over 5 frets to the 8th gets you a C, C Major.
Looks at them “shapes”
Ending Notes
Both the first and second variant were C chords, just in different positions. Why their relations are so will appear clear in a post soon to come. As the site is a work in progress, some concepts well be delved into further in future posts, just being touched on here, until the next one, keep on practicing new chords. You don’t need to understand the theory, just think about how it sounds. The sound of one type of chord has a different voicing from another, and you can manipulate it even further as much as your fingers will allow. You don’t have to know the “theoretical why”, but the “why” in why the chord evokes a certain feeling or thought. Why does changing the chord shape hurt or please your ear? You just know that specific note does(n’t) “sound right.” Maybe that intuitive feel isn’t there yet, it’s alright. You just need to expose your ears to something more, as you develop your technique, you’ll develop your ear.
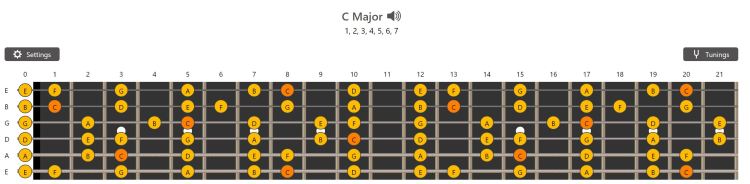
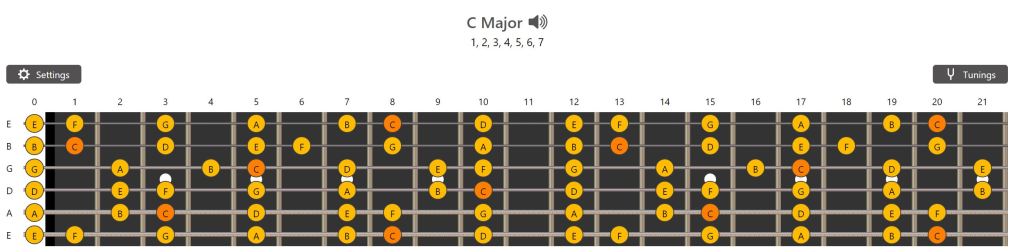
Seeing a scale chart at first might look like staring at a map of minesweeper, but, really, it’s not as scary. This, unlike minesweeper, can make sense!
Just looking at this gives you a wealth of information, with the understanding of a scale, you can understand the harmony of chords based on the scale. In it we see the Key the scale is in, we see the Scale Degrees for the “scale type”, and, taking the most space, the actual chart you want to look at.
Starting from the top, we see the chart is identified as a C major scale (sometimes might be written in various ways “C Maj”, “C Mj” or just the letter itself) In this case we go in knowing that the root note of the scale is C.
Then we see the scale degrees, the part with the numbers. Relative to the root of C, major follows the pattern of only using natural notes. It follows C, D, E, F, G, A, B, which is symbolized by the regular numbers there. C=1, D=2, E=3, F=4, G=5, A=6, B=7 It shows the natural form of the scale.
Finally we see the chart itself at the bottom. That actually shows all the possibilities of how to execute the scale. It also has the tuning, since a changed tuning changes the note’s position. Do you want to start from the lowest or highest C you can? And when specifically thinking in terms of stringed instruments, other factors come up. Do you want to run through it with just one string? Maybe over 2? Most instruments can hit a note in only one position/key (whether a trumpet, or a piano, the C4 you want to hit can only ring out when you execute it correctly through the piano key or trumpet valves (with mouth tightness)) On the guitar, the lowest C is the middle C (C4), on bass guitar it is C3, an octave lower. The range of the bass hits the lower registers, that’s why it’s called the bass guitar and uses the bass clef while guitar, starting with middle C, has you working in the treble range/clef. Their range is different, but their shapes remain, just take off the higher strings.
So technically, there’s the bass guitar and the treble guitar…
So How do We Start Reading It?
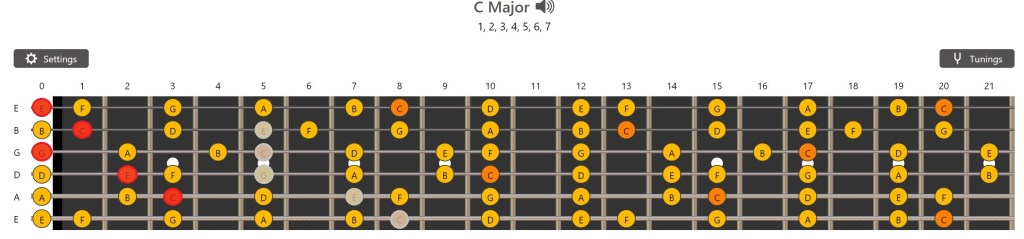
here we go again!
Up in the top is the image that is, but as a musician reading it, you need to see it as a roadmap of streets that you need to connect to get where you want to go. The pattern we follow, no matter where we position our end and beginning, needs to have C, D, E, F, G, A, and B in sequential order (we’re learning scales, not writing songs yet, it’s like learning to draw shapes correctly before you make an image you want later on, the core fundamental can help your technique and composition). We want to start on the C and end on the next one. This concept is about the octaves. The lowest C (root of the scale) is a C4, we want to end on the next one C5. The difference between the 2 is an octave. That’s why there are multiples of each letter throughout the fretboard. There’s multiple Cs (which are darkened in the image) but their octaves are different (though there are duplicates, which is discussed in the next section)
Scale on one string
In the image we have an approach to play the C Major. That first C is C4 (knowing the number is good to know but not integral, you can just know it as the lowest C)
Tabbed out it’s:
e----------------------------------
B----------------------------------
G----------------------------------
D----------------------------------
A----------------------------------
E-8-10-12-13-15-17-19-20-----------
  C D  E  F  G  A  B |C
That seems Easy…
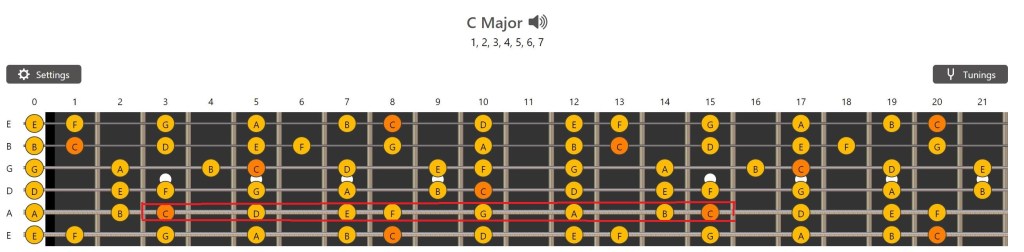
Yes it does, but since we are working with stringed instruments, that C4 we’re starting off with has another place to be hit. In a standard based tuning (E standard, D standard etc.), the same note can be hit on the next string, just 5 frets down (with the exception being with 4 frets between G and B strings.) That note duplication is what can make standard notation ambiguous for a person learning a fretted instrument, it’s why I favored learning tabs
It’s the same… but not?
We are still going through the C major, and hitting the exact same notes. The 3rd fret on the A string is C4, and so is the 8th fret in the low E (where we were in the previous run.) Both end on C5, and each note in between is the same pitch too.
e----------------------------------
B----------------------------------
G----------------------------------
D----------------------------------
A-3-5-7-8-10-12-14-15--------------
E----------------------------------
  C D E F G  A  B |C
Both variations together:
e----------------------------------
B----------------------------------
G----------------------------------
D----------------------------------
A-3-5--7--8--10-12-14-15-----------
E-8-10-12-13-15-17-19-20-----------
  C D  E  F  G  A  B |C
These are the exact same notes and pitches
Why would someone choose to hit particular notes on particular strings? Well even though you’re hitting the same exact note, different string affect the sound waves around the note. The higher strings have a a higher end tone compared to hitting the high note on the low string. It’s the same note but it’ll have more bass in the tone of the note hitting it on the thicker strings
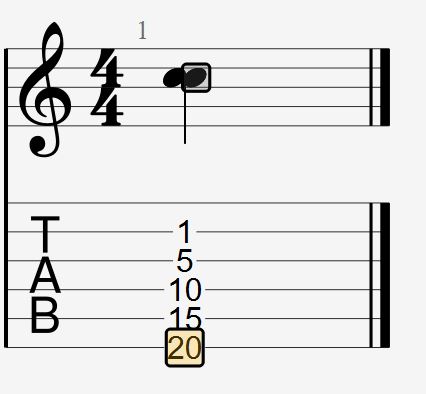
Same note Different ways
Right above is C5 on 5 different strings. According to the computer it’s the same note, but in our ears, the variances of EQ will stand out. And if your hand can play this, your superhuman-ness will certainly stand out
Why Are We Doing it One String? That’s silly
Yea it kinda is, and isn’t the way I would approach learning scales. I just wanted to show the basic pattern of the scale. With the understanding of note duplication, you can reorientate the scale to go over several strings.
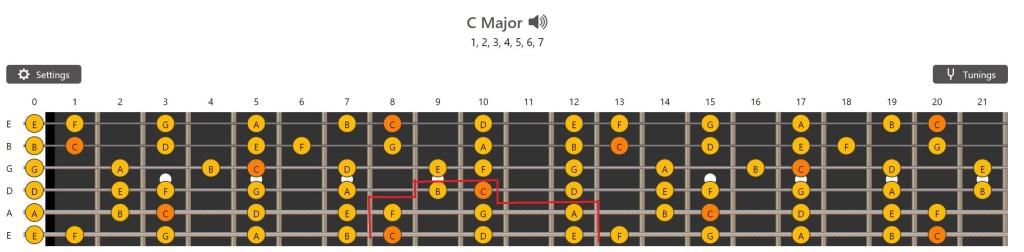
C Major with low E- based shape 1
Instead of going over one string, it was transformed to going over 3 strings
e----------------------------------
B----------------------------------
G----------------------------------
D-----------------9-10-------------
A---------8-10-12------------------
E-8-10-12--------------------------
  C  D E  F G  A  B|C
Since we have 6 strings, I like to create a shape that will go through as much and many times as we can through the scale
C to C to C (C4-C6)
This shape lets you start and end on the C
Tabbed out it’s
e------------------------------------------
B---------------------------------10-12-13-
G-------------------------9-10-12----------
D-----------------9-10-12------------------
A---------8-10-12--------------------------
E-8-10-12----------------------------------
  C  D E  F G  A  B|C  D  E  F  G A  B |C
It’s the same basis as the previous one but continues on!
Lets Try Another Scale!
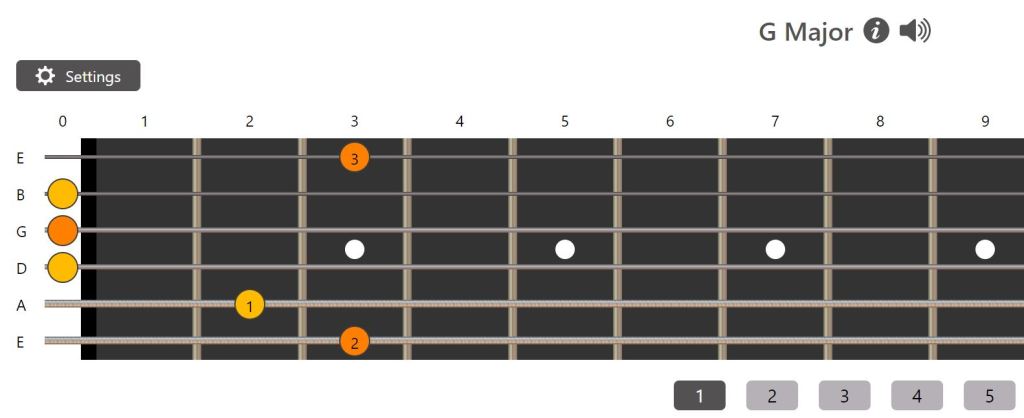
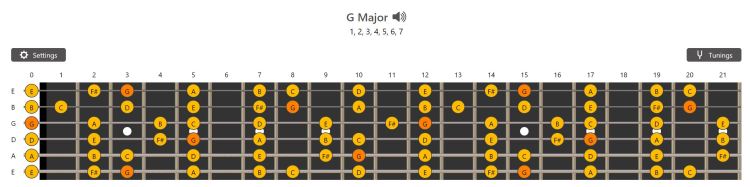
G, A, B, C, D, E, and F♯
This follows the exact same principle, look for a root to start off with and run the options until you hit the next octave and you have a scale planned out.
Something you may notice is that there is an F# in the scale. Earlier I said all the notes in C Major are natural notes, I didn’t lie. In between each note in the C major the same “distance” is followed (by distance I mean the steps/gap between the notes. Since guitar has steps expressed on the fretboard, it can be thought of as such) What I mean is that the scale degrees defines the major pattern, where the pattern applies tells you the key. Sounds SUPER trippy, but what I mean is just what’s below:
C Major C, D, E, F, G, A, and B
        C, C#, D, D#, E, F, F#, G, G#, A, A#, B,
G major G, A, B, C, D, E, and F♯
        G, G#, A, A#, B, C, C#, D, D#, E, F, F#,
This pattern, shown in the diagram above, can be thought as showing its “musical”/theoretical layout. From their respective roots, they skip the first next note and hit the following one. Comparing the C and the G parallel shows their pattern through the chromatic notes. The crossed out ones are not in the scale.
In the next couple of images, you’ll see it on the fretboard.
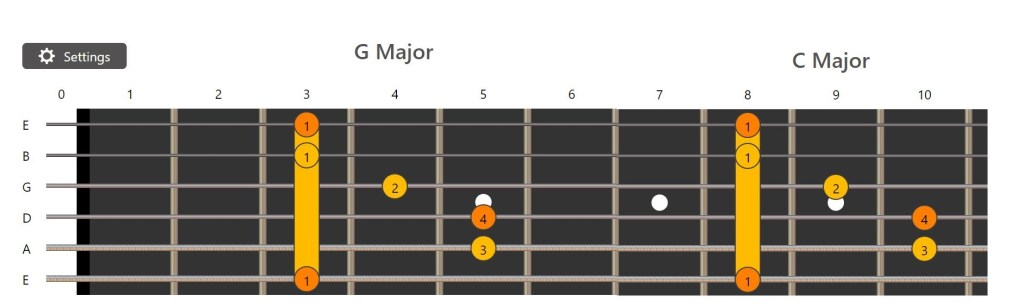
What did I get?
Kinda looks familiar?
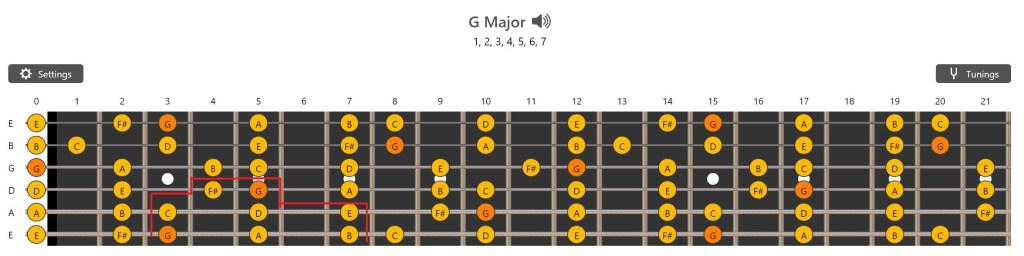
SO you may have noticed a shape come out of both. If you didn’t check this out
Look at the shapes
I put in both scales and the shapes around my “chosen path” are the same. The same shape applies to all major scales, the G major shape can follow the C and also follows the F# major. The shape can be brought to each root. Wanna use the shape on the lowest F#? It’ll work starting off on the second fret low E string.
Relative Scales
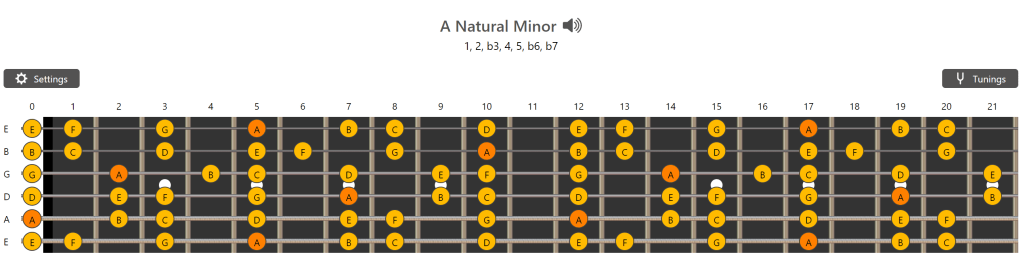
So the first scale we learned was C Major, and it was comprised of C, D, E, F, G, A, and B. So what if you want to go through the “cycle”/pattern of the C major, but you want to start with A? In that case you’d get A, B C, D, E, F, and G. Just because you followed the pattern of C major, only starting from A, it does not mean that it’s an A Major scale. A Major actually is A, B, C♯, D, E, F♯, and G♯, oh no we got some sharps in there. The scale that is defined by the pattern of A, B C, D, E, F, and G is the A Natural Minor (Usually it’ll be written simply as A Minor.)
Technically the same as C majorDe ja vu?
You read them both the same, the difference is in where the root is. Every major scale has a relative scale as a minor scale. Their options are within each other. Their root notes help you orient your playing and can get your brain into habits that didn’t really connect that you’re approaching relatively similar scales differently.
Are Shapes set In Stone?
Nah, the shape helps you get an idea of what you want, but how you branch off the core lets you make something overall that is your way. It will help you be comfortable with the scale around the fretboard when you manipulate the shape. A scale is a scale as long as it hits the notes, where they’re hit does not matter, so long as there isn’t jumping of octaves. By clinical definition, the scale needs the notes sequentially and within range, but when making music you can go in with an understanding of the pattern and jump around octaves and make your fun.
Sometimes having a blank canvas with nothing in mind can be scary, just starting off with a scale can help you narrow a concept down, or at least get you started making something. If you want to make something “simply”, try restricting yourself to only using the notes defined in the scale. Ever heard of Symphony #__ in the key of ___? Composers would sometimes write songs around the scale, sometimes not entirely but it’s the focal point of the piece. We’re not trying to compose for an elaborate symphony, we just want some organized sound with defined notes to start off with.
So get on to making something cool and pushing the boundaries of what you can do with the knowledge you have!
Coming Soon
The relationship between chord shapes and scale charts
There are several approaches to recording for different purposes, and today we’ll go over a couple.
Before You Reach The Record Button
Something to consider would be your space/environment. You don’t need to set up a space of soundproof where you can hear your own heartbeat, you just don’t want something (or someone) being louder than the sound of the instrument you want to record. Though your neighbors and others around you would greatly appreciate it if you do some DIY soundproofing. Some egg cartons and patches of carpet go a long way if you don’t want to get pro foam material just yet…
If you want to capture the reverb of the room or the driest signal of your instrument, you then have to consider the additional variable of mic placement. Consider how the room sounds, if you record yourself in a tiled space, like a bathroom, there’s a certain tone the room gives off compared to recording in a carpeted room. If you put a microphone too close you might hear sounds you don’t want, a poorly placed microphone could potentially capture the sounds of hitting the instrument (whether picking a guitar, the keys on a piano, or the valves of a trumpet) or you’ll get spikes in your audio levels you definitely don’t want. The idea that every variable is an important factor is entirely dependent on you, sometimes you just want to capture what you want; at the very least you want it audible.
Let me preface the methods by saying the order of them by no means gives them any sort of priority by myself. Try everything you can to find what works best for you. Experiment!
I will have a proper video demo for each method soon
Method 1: Mic Through Digital Audio Interface
It’s the standard way to record your music. You might imagine something like the image below to be what you need to record yourself properly
Presonus StudioLive 16.0.2 USB *Fancy*
It has a whole lotta ins and outs to make sure anything you have could be recorded or heard well in a specific environment. You might need something with more inputs if you are recording drums and want each individual part mic’d up, even then it might be thought of as overkill. Bigger models like this are usually either for big studios or places that host events (concerts, clubs, expos, anywhere sound needs to be even and live) Regardless, no need to go the fancy route when starting out.
I personally use the one below. There are many brands and models with devout followings that will say one “obviously” beats the other. In reality, when you’re starting off, the one you have access to is the one that’s best.
I will go in depth of the connections for setting up your interface in a future blog. For now this is a device that converts analogue signals to the digital realm to record in your favorite software
Presonus AudioBox (Front)
Presonus AudioBox (Back)
You’ll get different software with hardware. The one you start with usually is the one you’ll be most comfortable with, but don’t be scared to use one brand’s hardware with another brand’s software. Try anything you can get your hands on to record with. There are lots of software you can get trials of and lots of open source and free software.
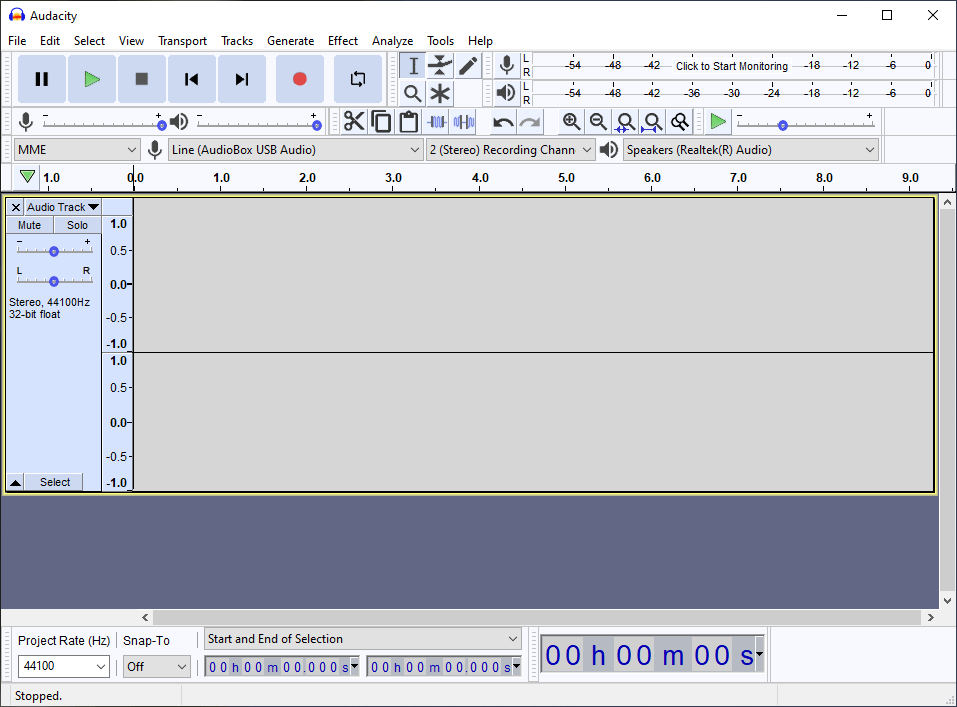
Mine came with StudioOne, but for this site I will try to focus on using open source or free software, when functions can’t be gotten on the free sources that I can get, I will use alternatives. For this site, we will work more with audacity. We’ll get into the more technical stuff with VSTs in other DAWs (and what DAW means) in another post.
This is audacity. You’ll also notice I’m using the audiobox for input
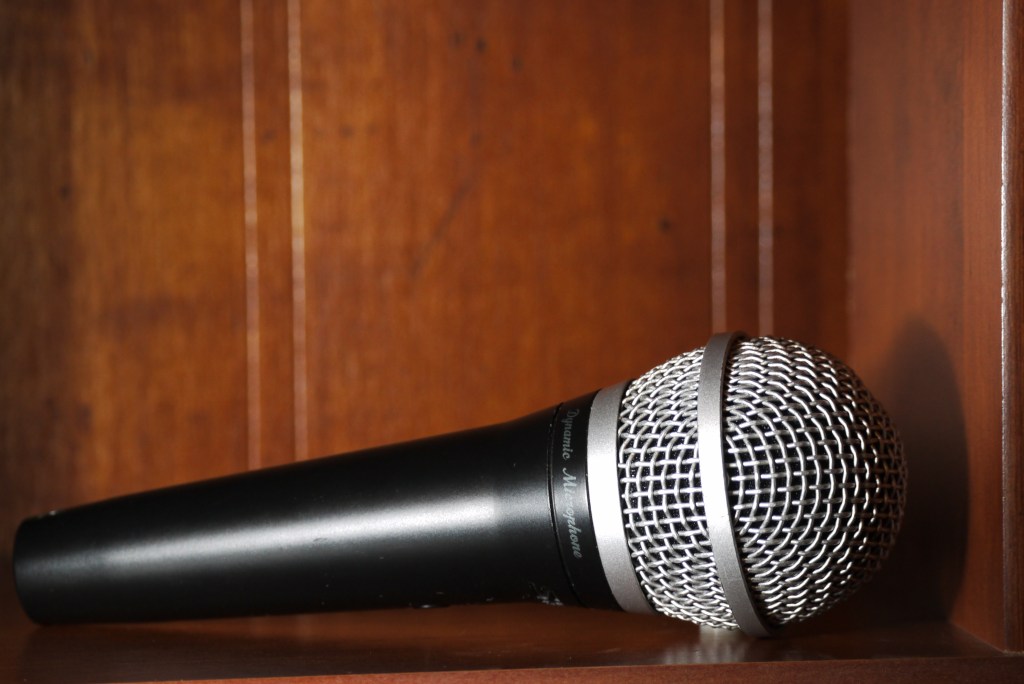
Another piece of hardware to get is the microphone and the cables to connect the microphone to the interface, the cables to connect the interface to the computer, and the cables to connect the interface to the audio output (for example headphones, or speakers.)
XLR Cable for Traditional MicrophonesA Basic Microphone, This is a Shure1/4 inch Cable for sending out from the interface to the speakers
Method 2: Direct-In Through Digital Audio Interface (Electric Instruments)
You may have noticed that there are 2 inputs in my interface, Mic and Instrument. They differ in their audio sensitivities. The specifics don’t matter when you’re starting out, as you build your studio you should find out more for what you want and the equipment you have to work with. I will also make another post about it, and proper levels setup, in the future.
You might want to use your favorite pedal(s) and get as “pure” a sound as you can of them. The benefit is that later on you can digitally manipulate it further while starting with a comfortable base. For example, you might have a distortion pedal you enjoy and feel comfortable using, later on you can decide to add delay the recorded audio. Delay can be pretty intensive so maybe you don’t know what kind or what parameters to use, so you can go through all the variations to add on to your tone and “do it in post!”
(effects will also be heavily discussed in this blog as more posts come, so don’t worry if the concept of effects are new to you, I will go in depth in the future soon)
Connect one end to you instrument’s output and the other to the interface’s input to go “dry”
You can also just plug in the instrument dry and add in digital effects provided by the software or added on by the user through VSTs to get into the digital amps within your computer.
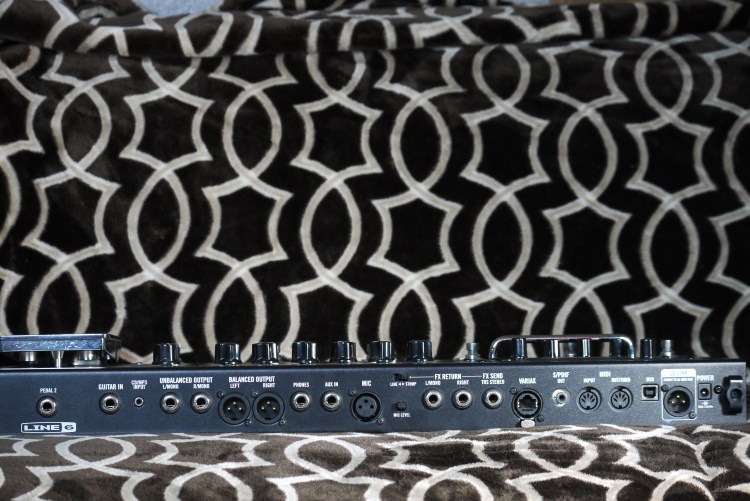
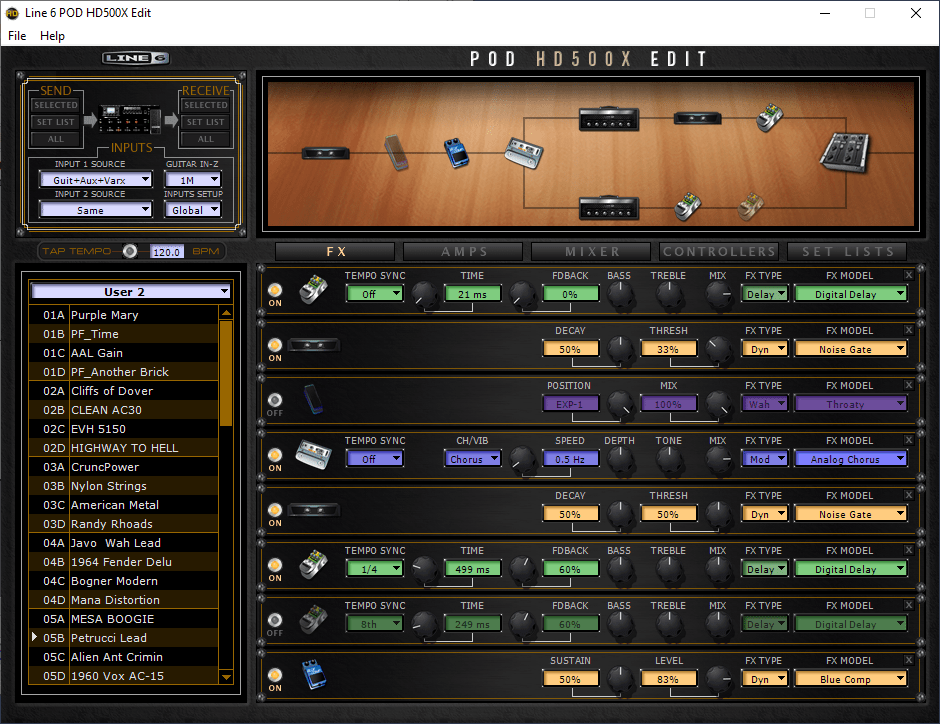
Method 3: Direct-In Through Effects Pedal Or Electronic Instrument
All them ins and outs for recording how you want
Some modern all-in-one effects units (line 6 PODs, Axe FX, Kemper, Headrush etc.) have the ability to record via USB with its full dedicated processing power, relieving your system from maybe running system intensive effects that could crash your system if you push it too far. The effects pedal/unit could take the place of the audio interface brought up in methods 1 and 2. Though it could also be connected to the interface with 1/4 inch cables, or XLR cables.
Some electric drum kits have the same functionality, where instead of capturing audio, it could be recording MIDI for you to set things up how you want later. In my honest opinion, MIDI is one of the greatest advancements in audio and music composition. At it’s core, it is like a stem cell, given the right push it become almost anything. With MIDI you can write drum track, piano, guitar or any instrument you can think of. It’s why an electric keyboard has a couple drum kits, synth pads, pianos, guitars, and so on all in one device. It’s basically the standard notation of music for a computer to read.
The big benefit of working with a digital platform like those is the ability to edit in a computer to fine tune parameters. You can create a new synth sound. You can change the hit of the hi-hat. You can create your own signal chain, from beginning to end, the only limit being your imagination. What’s a signal chain? That will be a very comprehensive blog soon! For now it’s just the path from instrument to the sound coming out through the speaker. Down below it splits up and is panned left and right for a stereo sound. What’s that mean? Stay tuned!
This is the editing suite for my unit. The window in the top right is a visual representation of the signal chain
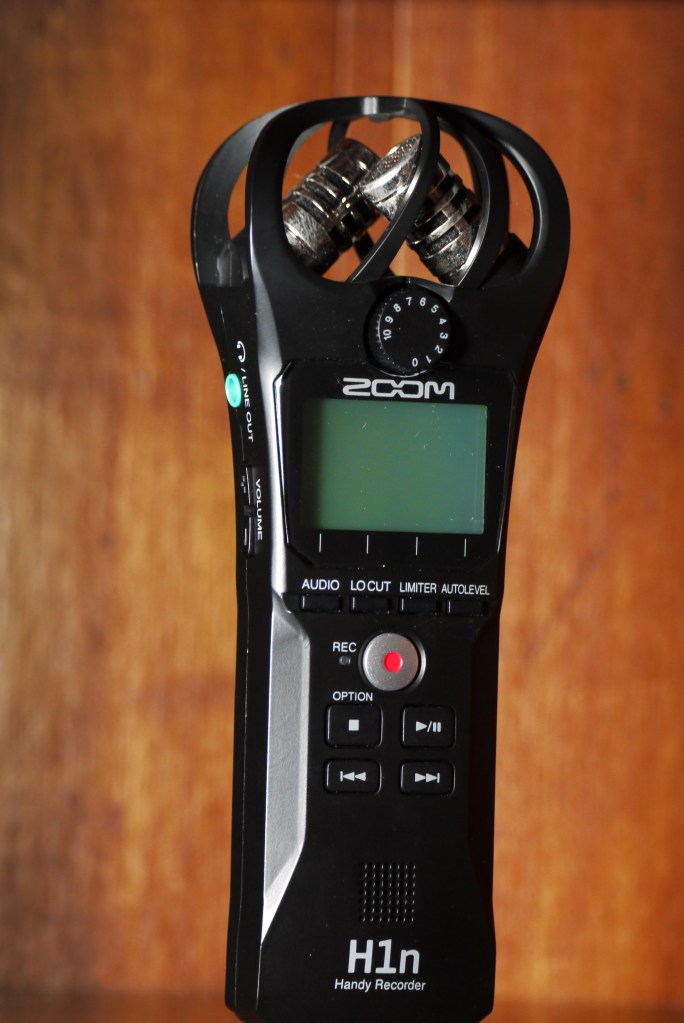
Method 4: Anything With A Microphone
Portable Audio Recorder
I have a couple devices I use because I am crazy, but also like to have something reliable to record with within reach. The device you’re reading this on, whether a computer, your phone or your smart fridge, there’s an audio recording function that you can take advantage of. It might be called “memo”, “voice recorder” or something but there should be a utility to record audio, if not, there is always an app for that. (I will try not to recommend specific apps since apps get sold and change so I can’t reliably recommend an app to always be good. I’ve had great apps I bought being sold to another company that takes away features behind another pay wall. The only way to be sure you have a safe recording function that’s not tracking more than it should (like through your phone collecting more than audio…) is to get a dedicated device, or look careful into apps for their data collection habits to find something safe. There have been stories of people losing data to dumb flashlight apps so be careful!)
The smarter devices follow the rule of “jack of all trades, master of none”, which is why I got a dedicated audio recorder without the “brain” of smart devices to slow me down.
Me no want brain, brain make slow. Just record!
What’s the best???
Truly, the best one to use is the one you have access to. Though there are some pros and cons, and whether it’s even a pro or a con is up for debate, but you find what you can work with and experiment. Do you really wanna get as dry a signal as you can? Would you like to record dry AND wet tracks? You can even mix and match methods for creating a double track or for testing ideas.
Unlike with methods 1 and 4, Methods 2 and 3 brings no worry of mic placement (unless your digital effects unit can take it into account.)
Methods 2 and 3 essentially work with anything with wirings of pickups since it’s about going directly in. Methods 1 and 4 are about working with a microphone, if it makes sound, it’ll record it
My first recorded songs were recorded with an insanely cheap mp3 player, the kind you could probably get at a vending machine now. I recorded every track individually with the poor built-in mic and synced them all up, it wasn’t a masterpiece and it wasn’t supposed to be. I was still learning with the tools at my disposal.
As long as audio can be captured it may be good as a sort of notepad of ideas. That’s why visual artists have sketch pads vs canvases with them everywhere they go
Example
[Intro]
e|--------------------------------------|
B|--------------------------------------|
G|--------------------------------------|(x3)
D|--------------------------------------|
A|-----4----5----4----2-------2---------|
E|-2-2---2----2----2----5-4-5---5--4--0-|
The top example of this lesson is based on Crazy Train by Ozzy Osbourne (Full Tabs, VIDEO Live Version).
Overview
The way to internalize the layout of tablature is to think of it as a timeline of different locations and events that happen along a unified stretch of time. Maybe the line is referencing events occurring in location A, B and C and at certain times there only events in one of the locations, or there can be multiple events at the same time in different locations. In terms of tablature, the different locations are each string. The events are the note strikes of the song themselves. And the unified stretch of time is the length of the song.
Tuning
The letters on the start of each line of the hyphens represents the tuning of each string. Tuning can be known as the coordination of your string pitch on open notes on each string. Open Notes mean to say that you are not holding down any frets, but are instead letting the string ring “openly”, signified with number 0 in tablature. In this case, this is an E standard tuned song as EADGBe. The lowest line represents your lowest string (may sometimes be considered the 1st for some, but for me, I’ve known it as the 6th) the low E (it’s with a distinction to say the “low” E since there are two of the “same” notes in different octaves. This one is at the pitch of E2) Then going up the notes is the 5th string which is an A (A2). Followed by the 4th string signifying the D (D3). Then the 3rd string, G (G3). Almost done at the 2nd string, B (B3). Finally the 1st string E (E4).
Frets are informally known as the spaces in between the metal (silver bars), but is actually the metal itself. As discussed earlier, 0 is the open string, but the first “open space” is the first fret. From then on, each space is the next fret number.
Layout of a fretboard
After that, you can do a lot of fun stuff by just only knowing the tunings at first, then learning your favorite songs. Though soon it would be to your benefit to try alternate tunings to give you a different “view” of the instrument and could inspire you to do things you wouldn’t be able to, or would normally, play. Also much to your benefit would be to understand and develop an understanding of the theory with why “it works” the way the songs were written out, and learn to write some stuff you’ll enjoy hearing and playing of your own!
So on to the reading of it. Reading from left to right, and reading the lowest line as the lowest open string, you’ll see the first note is 2 on the 6th/E line (string). Every other string has nothing going on, so it’s a single note. The 2 is the numbered fret to hit on the string, this helps picturing the guitar neck as a grid like a chessboard, in this case it’s not just the ABCs (like the C3 space and other coordinated on the chessboard) but the string note (or number) to the noted fret. Continuing on, the tab gives the note again (2nd fret on the 6th/E string). Followed by the 4th fret on the 5th/A string, back to the 2nd on the low E, 5th fret on the A string, and so forth. The 3X just means to repeat the section for 3 times total.
Now, if you’re familiar with song you can already imagine how the rhythm of the song is to learn it on the tablature alone. However, if you have not heard the song you may be confused on the timing of the song by just checking out the tab on its own.
Down below is a more robust and informative way of displaying the tablature. It has more information due to the lines below the fret numbers. This kind of layout combines standard notation and tablature.
Combining Tabs and Standard Notation
You must understand the basics of standard notation to read this effectively, though you don’t need a deep understanding for reading this well. You must know the signification of whole notes, half notes, quarter notes, eighth notes and and so on connecting to the note, and understand tempo to get the most out of what’s in the image representation of the tablature. The tempo is the number on the top left, so the song follows 138bpm. (Click ‘this’ for more info on standard notation:THIS) This is a relatively simple intro since every note length is eighth notes straight through it.
Another Example (With Chords)
Zombie by The Cranberries
The next example shows chords for the song, which is Zombie by the Cranberries. You see, first off, the song follows a tempo of 84 bpm, and instead of single notes it’ll be chords (Chords are just any more than one note played at the same time. You can learn more about chords HERE) for this section. You see that unlike the previous song, which had only eighth notes one-by-one, this one includes sixteenth notes in chords, which mean their value in time is less/quicker, and that you’ll be strumming. The single line ___ ( which represents ♪ and ♫) means it’s an eighth note and the doubled lines == (𝅘𝅥𝅯 and ♬) note that it’s a sixteenth note. The more lines, the shorter the note.
That red line in the beginning is a visual representation of a moment in time (certain programs, like guitar pro, will play the tablature and every track follows the red line.) This means you will need to play all six strings at once, with your fingers on 2nd frets of the A and D strings and so forth, and strumming your chords through the song.
Example of Playing With “Live Tabs”
Couldn’t put crazy train since it might get taken down, so enjoy a run of G Major from nothing in particular
All the tabs shown before are in a “static” state, which I mean to say that it’s just read and followed by your eyes, at your own pace. Here is playing along with the actual track. Follow that line to let you know where you are, what’s coming up next, and how soon (tempo). Learn more about how to read these kinds of stuff HERE.