
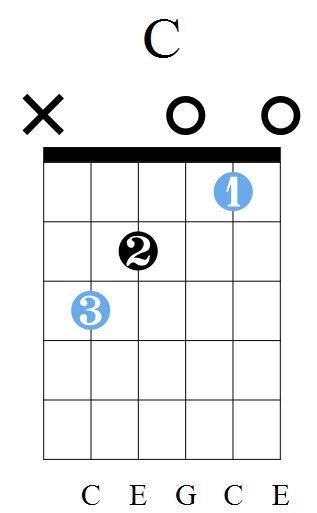
Up top is how most books (remember those?) or other places/sites express their chords. There are a couple symbols, shapes, numbers and grids, with some letters at the bottom, what does that stuff mean?
Before we begin…
You may ask: “What’s a Chord?” Well it’s 2 or more notes played simultaneously on the same instrument. As far as I know, only multi-stringed instruments can play chords (guitars, violins, banjo, piano etc.), so if you’re rocking something like a whamola, no chords for you. You can’t hit more than one note on a trumpet, or a flute. In those cases, a composer spreads out the chord between instrument 1 and instrument 2 (you may have heard a musician mention getting first or second chair or something, it’s about the piece they got.) Even though they are playing the same piece, they will each have something unique in their version of the piece. The goal is to hit certain notes to create harmony to simulate a chord progression. All this is a bit more advanced to read just starting out, but the trippy part is what makes the approach to guitar be something a little different. Your guitar has a couple strings and each string can hit 1 note at a time, in a sense, you can think of the guitar as an orchestra you conduct with your fingers. Each string can be considered its own instrument. Having that in mind can make the instrument seem even scarier, but don’t fret, you’ll be conducting your guit-ymphony (a portmanteau I made up for your guitar symphony! You saw it here first folks!) soon enough!
Enough with the abstract thought experiment. Let’s get on to the charts!
Identify!
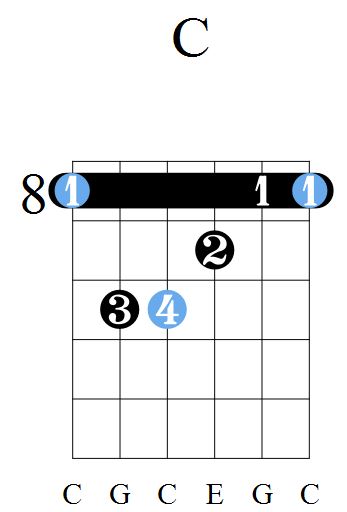
Above the figure is the letter “C”. You may have heard majors, minors, add9s or some variant to express chords. The most common “base” for chords are Major and Minors, I say base since there are many variants of chords based on the origin, and this figure is a major chord. In this example, and most commonly, you won’t see anything other than the letter to let you know it’s a major chord. Sometimes it could be written as “C Mj”, “C M”, or just spelt out “C Major”.
So what are we looking at? C Major
Now lets get into the main diagram in the image, top to bottom:
Open or Closed?
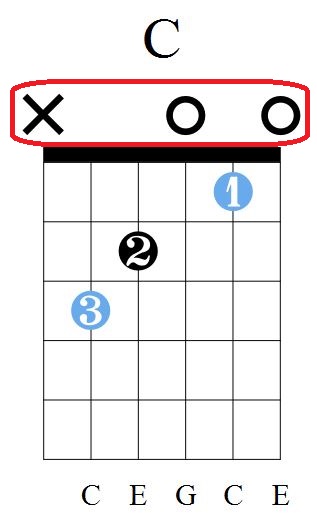
Under the chord name, there are 2 symbols over 3 spots, an X and 2 O’s. This is about the concept of open and closed notes. I talk about open notes HERE, but it is just the note that rings out when you aren’t holding down a fret (also discussed in the same post.) The open notes are shown with O. Then there are closed notes, X. With those, you need to think about keeping the potential for vibrations to ring through the strings “closed.” The symbol means to try to avoid the string ringing by your preferred method (some people use their thumbs for blocking the string (reaching over the neck), some use the skin around the fingers, or more precise picking technique to avoid hitting the string, whatever works is a method you can use)
These symbols are right above the string the motion is applied to, in this case the X is over the low E string, with O’s over the G and high E strings (the concept of tuning and their strings can be found HERE.)
What’s the fretboard looking grid thing?
Under those X’s and O’s you may see on a chord diagram is a grid. The grid is like drawing stick figures for people but for the guitar’s fretboard. It doesn’t have to be the most elegant looking so long as it has the basic shapes that tell you what you what it is. Something to note is the visualization is of a right-handed guitar as you’re staring at a fretboard head-on, from left to right is the thickest string (lowest pitch) to the thinnest string (highest pitch) on the right.
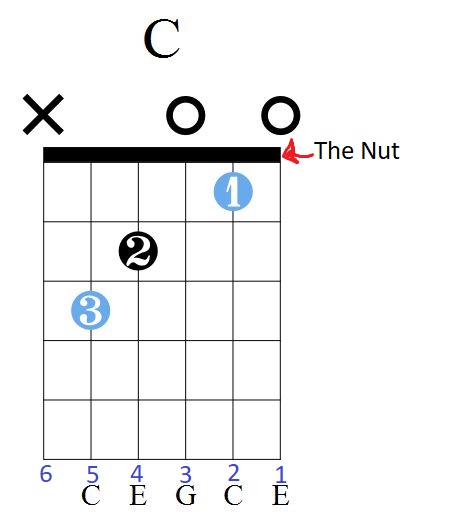
The most top part is a thicker line, that represents the nut, that’s why the X’s and O’s are placed above the most top line of the diagram, open notes can be thought of as hitting the “0th fret.” The symbols are there if there is no fret to press down on the string.
The top line always gives you a reference point, though it’s not always the thick/bold line for the nut, we’ll look at one of those alternatives down below, you can wait, right?
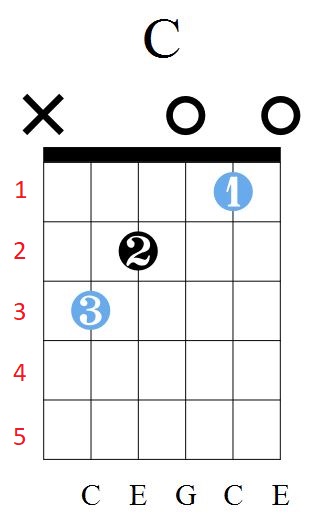
Like a guitar fretboard, the spaces in between the line is the fret number to press down. Starting from left to right, using what we’ve already learned, we see the 6th string has an X so we skip that string. The first note is on the 3rd fret of the 5th string. Then the 2nd fret on the 4th string. An open G string. 1st fret on the 2nd string. Ending with an open high E string.
You may have noticed that there are numbers in circles where you should place you fingers. At first sight, it looks like the number is the fret number… No, no, no it’s not that. It is merely a coincidence. The number is what finger it is recommended to use. Starting with your index finger (the one people tend to use to point) is 1, your middle finger (the bird that doesn’t fly) is 2, your ring finger (the one you put a ring on) is 3, and your pinky (the one you put to your mouth horizontally when you have a gnarly evil plan) is 4. Though the 4th isn’t shown in this diagram, you will see it in other chords. But some are blue and some are black, why? The blue is the instance of the root note being hit in the chord, in this scenario it’s C. The black is notes that aren’t the root note.
wat?
Those Letters at the Bottom
So I just brought up root notes, what and why are they? Every chord has a set of notes that make it defined as such. The root note is the base of the chord. Generally, the lowest note should be the note the chord is based on, you can’t hit a C on the low E in that position, so, theoretically, it has to stay out of the equation of the chord. The low E has nothing below since no note is supposed to ring out. Then from the A string to the high E use C E G C E, respective to each string and fret sequentially.
The notes between the blue define the chord “core”. From the lowest note to the next octave, that is one instance of the chord. The core of C Major is C E G, after that, it is repeated for as much as you can. After that G it hits a C and E again. I will have a lesson like this going over reading chords for piano, with that instrument, and its linear nature, you can really see the pattern for chords and scales. (It is now HERE)
You can Do it!
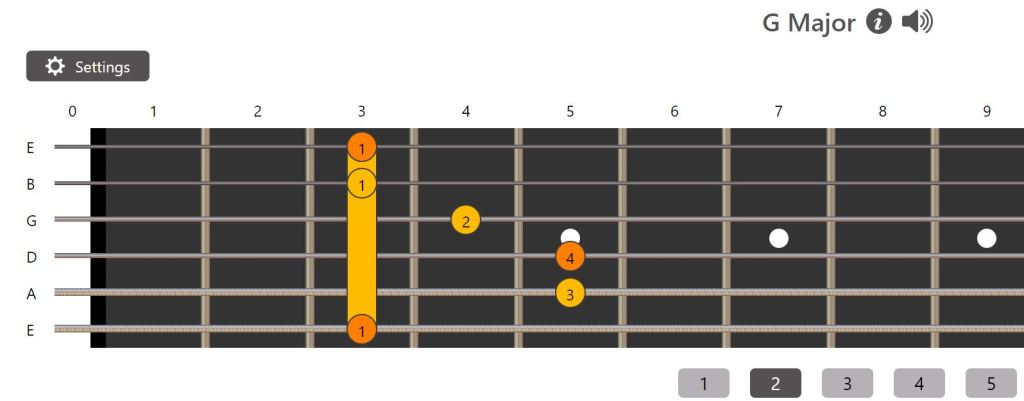
Now we’re working with a barre chord. What’s that mean? Well you may see that there is a bold black bar over a fret that extends from the string on one end of the fretboard to the other on the other end. That’s what your finger should cover as the base of the chord. These kinds of chords require stronger fingers so don’t be discouraged if you can’t hit it at first, you need some finger strength to have the notes ring clearly (and depending on the setup of the strings (the action height) can make you have to push even harder or lighter.)
You may notice that the most top of the “fretboard” doesn’t have the nut like the chord before, that’s because this chord is in a different position of the fretboard. There’s an 8 next to the fret space, that’s the starting point for the image.
Using what we learned so far, we should be able to finger out the chord. That barre over the 8th fret is tell you to use your index finger across the whole fretboard over the 8th fret, but it should only ring over the Low E, B, and High E strings. The ring finger should be on the 10th fret of the A string. Your pinky should be over the 10th fret of the D string. Your middle finger should be on the 9th fret.
The force of your index finger does not have to be applied to every string, as most of the middle of the chord has other frets being pressed. The focus should be on where the 8th fret needs to ring out, the low E and the B and high E. There are 3 strings between the low E and the B, those have frets defined. Your force and focus should be on them for your index finger, every other sting has a single finger for it. This focus is good as you’re starting off since you need to build up strength, eventually you’ll need to get the strength to barre one fret across all strings, even doing it across the first fret. Learning how to control a barring finger lets you approach chords differently, it’s how I finger a high D Major and can transition it to a D sus2 and back using only 2 fingers, instead of the traditional 3 finger approach. Not everybody’s hands are made the same, if you can do the traditional method, cool, if not, there’s another way, or sometimes you can but you just want to try it different, do it. The experimentation you can do with your instrument to play best for you is amazing, don’t be afraid to try the unorthodox
You may notice the pattern is a little different, here it is C G C E G C and in the previous it was C E G C E. Theoretically, you could alter the chord so the G in the second variation of C Major can be E, but, due to the nature of the guitar, you can’t have both G and E to sequentially play the pattern of the chord the same way. In the end, the core of the chord is found in the middle section of the chord C G C E G C, albeit in the next octave.
Another View
Shapes???
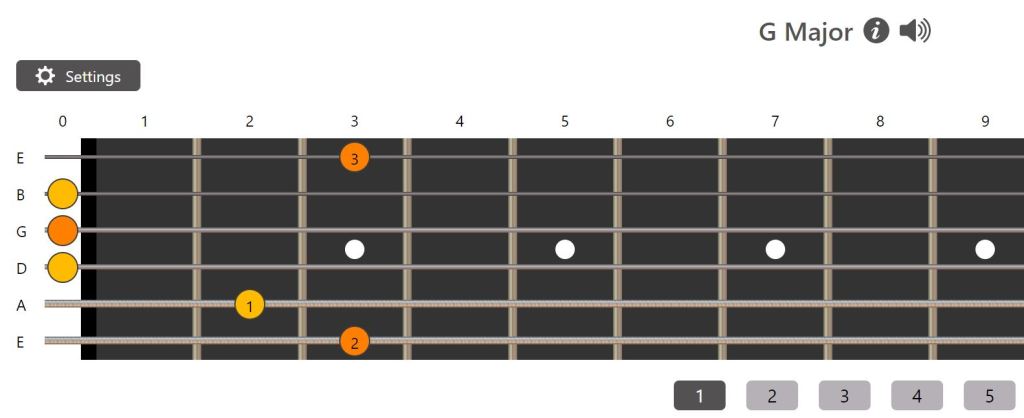
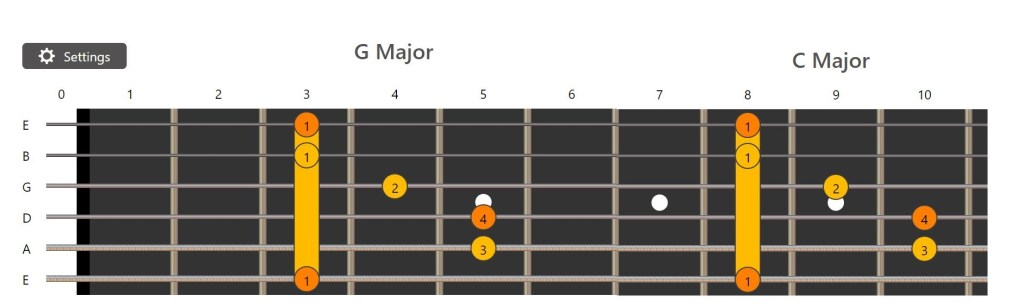
So there is a very important concept that applies to guitar in its standard tuning, SHAPES. That second variant of the G looks very similar (practically identical) to the C we saw earlier. That shape can be thought of as the “major shape”. Holding that shape, using the six strings, will give you a major chord no matter how high or low the fretboard you are. The root (lowest note (the note on the low E string)) tells you the chord. Holding the shape with the root on the 5th fret of the low E means you are hitting an A Major chord. Here we have the first at the 3rd fret of the low E which is a G thus G Major, and then sliding over 5 frets to the 8th gets you a C, C Major.
Ending Notes
Both the first and second variant were C chords, just in different positions. Why their relations are so will appear clear in a post soon to come. As the site is a work in progress, some concepts well be delved into further in future posts, just being touched on here, until the next one, keep on practicing new chords. You don’t need to understand the theory, just think about how it sounds. The sound of one type of chord has a different voicing from another, and you can manipulate it even further as much as your fingers will allow. You don’t have to know the “theoretical why”, but the “why” in why the chord evokes a certain feeling or thought. Why does changing the chord shape hurt or please your ear? You just know that specific note does(n’t) “sound right.” Maybe that intuitive feel isn’t there yet, it’s alright. You just need to expose your ears to something more, as you develop your technique, you’ll develop your ear.
Coming Soon
The Relationship Between Chords And Scales– What’s the thing that unifies the shape of scales and chords???

3 thoughts on “Reading Chord Charts (Guitar)”